Showing posts with label Holy Grails. Show all posts

Sunday, January 6, 2019

Best of 2018


The mere five products I selected for this post boosts my confidence for No Buy 2019: I'm less interested in purchasing slews of stuff and more interested in using what I love, and I've become a lot more particular about what I love. I didn't just enjoy these products in 2018; they became actual staples, items I use almost daily and repurchase without hesitation. Without further ado, here's the five best of 2018!

Skin Laundry Daily Moisturizer SPF35

I can't remember what, exactly, prompted me to buy this moisturizer. It promised more than SPF15 and great hydration while containing none of no-no ingredients, sure, but so has every other day cream that's absolutely wrecked my face. Whatever the reason, I'm beyond glad that I took the chance. As far as day creams go, this thick lotion is rich and hydrating without feeling heavy or looking greasy on my skin. It works wonderfully under makeup and never seems to break me out or irritate me. And it's proven its worth as a day-to-day sunscreen: the only time I burned during our Toronto vacation was when I forgot to apply this moisturizer in the morning. I'm actually at the end of this tube and am therefore rationing it until it's back in stock at Sephora, but when it does come back, I might get two tubes so I don't run out again. Thanks, Skin Laundry, for creating a day cream I love.

Glossier Lash Slick

"Another year, another Glossier favorite" seems to be a running theme on this blog, and 2018 was no different: I fell in love with Lash Slick mascara. I was a little surprised when they launched this product, actually, because it's not the barely-there lash tint I expected, but rather a fiber mascara that lengthens and separate. While the effect is nice, what really made me fall in love with this mascara is that it doesn't smudge or flake as horribly as almost every other mascara I've tried. I can swipe it on at 8:30am, work all day, and come home at 6:00pm with next to no black specks or racoon-y smears. As an added bonus, the stopper inside the tube works perfectly, getting off every extra bit of product so you can go straight from the tube to your lashes. Glossier has produced some questionable products, but Lash Slick is a definite winner.

Jordan Samuel Hydrate Serum

Objectively, most people shouldn't spend a lot for hyaluronic acid: it's a cheap ingredient that's easy to use in a range of formulations. Unfortunately, most of the cheap, readily available hyaluronic acid serums and essences seem to break me out or irritate my skin--I'm thinking there's a common carrier ingredient that my face doesn't like. I'm willing to shell out $29 a bottle for Jordan Samuel's serum because it gives my dry, dehydrated skin the help it needs without any irritation, and it never pills under my other skincare products. I'm about to start my third bottle, which, based on how frequently I use it, suggests that each ounce of serum would last about 3 months with daily use. My favorite way to apply this? I mist my skin with a little distilled water, pat 2-3 drops of serum in to my damp skin, then top with moisturizer. Magic.

Philosophy Renewed Hope in a Jar Skin Tint

While this jar packaging continues to be the bane of my existence, I've loved the tinted sunscreen inside. It's weightless, it looks like skin, and it's easy to slap on when I'm half awake and still glugging coffee. And despite containing SPF, this skin tint never turns white in flash photography, making it great for outdoor special events; I've worn it to several weddings, for instance.

Charlotte Tilbury Beauty Light Wand

It wasn't so much the hype that made me buy this highlight as it was the absolutely stunning photos of glossy-cheeked YouTubers and Instagrammers. That mixture of dewy and high-shine can be tough to achieve, but the Beauty Light Wand makes it a breeze. It's fairly flexible as well: you can use the tiniest dot for a more natural glow, or you can layer it on thicker for cheeks that look outright wet in pictures. My only qualm? Last I checked, there was just one shade, a light champagne gold. Expanding the shade range would make this an absolute Holy Grail for me.


Honorable Mention: That Sequin Fabric

Remember when I always had a television or some other janky nonsense in the background of my pictures? That finally stopped when I got a yard of sequin fabric on sale and JoAnne Fabrics. I know it's not to everybody's taste, but I finally brought that fabric back with me to our new apartment, and I couldn't be happier. In my opinion, it helped my photographs look more professional and more consistent in 2018. I'm hoping for more of the same in 2019.

Sunday, August 19, 2018

Holy Grail Products I've Replaced (or Supplemented)


People often send me incredibly kind messages and emails telling me that they love my blog. And in a solid half of those emails, these incredibly kind people mention that one of their favorite things about my blog is that products I rate highly or call my favorites generally reappear for years and years. I take pride in the fact that, when I say I love something and it's a favorite, I mean it. I will almost never call something my Holy Grail unless I have used it for at least a year and/or finished an entire tube/bottle/stick/whatever.

That said...

Now that I've finished my move and started wearing makeup again, I'm noticing that I keep reaching for specific products. Many of them are not my much-raved-about Holy Grails. Instead, they're products that have entered my collection in the last year or two. It used to take me forever to replace a Holy Grail favorite, but it seems to me that changes in consumer tastes and improvements in product textures and ranges have resulted in a lot of new stuff that suits me better. (That is, cream and liquid products that are easy to apply and take very little effort, also known as "makeup for lazy people.") When the Holy Grails I've Replaced tag became popular on my YouTube feed, I knew it was time to talk about these new loves.

Bear in mind that I still love all of these products, that the original Holy Grail is still a better choice in some scenarios, and that I would still give all of these my wholehearted recommendation. But in my day-to-day life, yeah, the newbies are taking precedence.

Shu Uemura lash curlers -- Surratt Relevée lash curlers

I used the Shu Uemura lash curlers for most of my undergraduate years, but I switched to the Shiseido curlers when Shu left the US. While the Shiseido version worked well, I decided to give Shu Uemura another try last year, and I had to admit that the Shu just gave me a better curl overall. Then somebody offered to sell me their like new Surratt curlers at a super low price. Now, I admit that the Surratt curlers can pinch my eyes a bit, mostly because it's a bigger tool with a bigger opening and I suck at positioning it. But while the Shu Uemura curlers sometimes have trouble grabbing the lashes at the outer corner of my eye, the Surratt curlers never miss a lash. Shu Uemura lash curlers, $22; Surratt Relevée lash curlers, $30.

Maybelline Full n' Soft Mascara -- Glossier Lash Slick

Maybellin Full n' Soft remains my go-to mascara for voluminous, fluttery lashes that don't smear or flake horribly. But if I'm not too fussed about getting a lot of volume and I want next to no flakes at the end of the day, I go for Lash Slick. It's become my go-to every day mascara: I can slick it on at 8am, work until 4pm, run errands in to the evening, and go out to dinner with zero mess. Despite the great staying power, it's also easy to remove with a Makeup Eraser and warm water. Glossier really killed it with this launch. Maybelline Full n' Soft mascara, $8; Glossier Lash Slick mascara, $16.

Buxom Show Some Skin Foundation -- Philosophy Renewed Hope in a Jar Skin Tint

Let's make one thing clear: I'm still more likely to recommend the Buxom foundation over the Philosophy tinted moisturizer. Buxom Show Some Skin has a much more inclusive shade range, and the packaging doesn't make me want to cry every time I open it. But I wear that Philosophy Skin Tint several times a week now, and I haven't reached for my Buxom foundation since I moved. I just find the Philosophy more comfortable and natural-looking on my very dry skin--once it's settled in, my skin looks smooth and lovely, but almost makeup-less. It's also a slightly better shade for my casual makeup days now that I self tan my neck. Buxom Show Some Skin foundation, $34; Philosophy Renewed Hope in a Jar Skin Tint, $39.

Rohto Skin Aqua UV Super Moisture Milk SPF50 -- Skin Laundry Daily Moisturizer SPF35

I have yet to find the dry-skin friendly sunscreen that will beat Skin Aqua for long, sweaty days in the sun. However, I'm definitely preferring the Skin Laundry Daily Moisturizer SPF35 for my day-to-day needs. It has a rich lotion texture and lightly hydrates my bone dry face while sinking in relatively quickly, working well under makeup, and never breaking me out or causing irritation. Also, Japanese sunscreens are frequently discontinued or reformulated to keep up with market trends. The relatively new Skin Laundry line, however, seems like it will be a bit more slow to change. Rohto Skin Aqua UV Super Moisture Milk SPF50, ~$10 on eBay; Skin Laundry Daily Moisturizer SPF35, $25.

Becca Shimmering Skin Perfector -- Charlotte Tilbury Beauty Light Wand and Glossier Haloscope

I've finally admitted that it's time to throw out the bottle of Becca Shimmering Skin Perfector in Pearl that I've clung to since grad school. This stuff is way past its expiration date, after all. But even more than that, I just don't reach for the Becca highlighter as much as I used to. Mind you, it's still one of the most gorgeous, photogenic, and versatile highlighters on the market, and I'm sure I'll repurchase it one day. But I've been favoring quick-and-easy over versatile these days. I don't usually want to carefully ration how much Becca SSP I apply for a natural look; I just swipe on Glossier Haloscope in Quartz and tap it out with my fingers. I don't want to layer Becca SSP for a wet look; I'd rather spend all of thirty seconds swiping and blending the Charlotte Tilbury Beauty Light Wand over my cheekbones. I'm lazy, you guys, and I'm finally admitting that that extends to my makeup. Becca Shimmering Skin Perfector, $41; Charlotte Tilbury Beauty Light Wand, $38; Glossier Haloscope, $22.

Thursday, August 9, 2018

Replacing My HG Powder


This smeared, rubbed bare, looks-like-my-cat-got-hold-of-it compact is actually the Dolce & Gabbana powder foundation I've loved for years. It's the softest, most natural, most finely-milled powder I've ever dusted over my dry skin; the shade 50 Ivory was perfect for me, and I could use the product sparingly as a setting powder or apply it a bit heavier in lieu of foundation without looking like a sheet of sandpaper. Unfortunately, Dolce & Gabbana hates my happiness and decided to discontinue the product when my back was turned. Even if it was still in production, I don't know how comfortable I'd feel repurchasing it now that I've discovered that they've done some shit.

So I'm on a quest for a new powder! There's no critical rush, since this compact will still last me a while. (I don't wear makeup every day, and even when I do wear makeup, I tend to skip powder in the cooler months.) But you see, I need to start a list of potential replacements nowbecause I am Hella picky. My short list:

  1. It must be pressed. I've tried loose powders, and while I like how some of them look, the mess and the inability to throw it in my purse for touch ups is a downer.
  2. It must be light coverage. Again, I like a powder that I can use lightly to set makeup or instead of foundation, ie, if I'm wearing sunscreen and concealer and just want a bit more evening out.
  3. It needs to be an NC5-15 shade that doesn't oxidize. Because I have dry, dehydrated skin, I use a lot of rich skincare. I've discovered that moisturizing ingredients can make powders turn a few shades darker within an hour. While I'd prefer something that leans lighter, I'll go for an NC15 shade if it can be sheered out.
  4. I shouldn't have to sell my kidney to afford it. $50+ was pushing it for this guy, but it was so damn perfect that I was willing to pay it. But frankly, I'd hate to pay more than $50 for a powder these days.
  5. It cannot emphasize dryness or look powdery. I know, I know: it's kind of absurd to insist that a powder not look like powder. But the D&G powder foundation always had the smoothest, most invisible look on my skin while still slightly mattifying and providing a hint of coverage. There HAS to be other powders that can do that for me.

The powder that seems like the best possible replacement is the Charlotte Tilbury Air Brush Finish Skin Perfecting Micro-Powder, which gets nothing but rave reviews, especially from fellow dry-skinned people. However, I'm told that there's not a lot of product in the pan (Nordstrom says it's 0.28oz, which is half the size of the D&G powder), and that what's in the pan is relatively loosely pressed. Pictures showing almost-empty compacts after a mere three months of use are enough to make anyone nervous.

Soooooooo...help? What are your favorite dry skin friendly pressed powders? 

Sunday, February 4, 2018

My Favorite Red Lip Pencil


Before I wised up to the racket that is "free shipping when you spend X!", I would toss things I didn't really want or need in to my shopping cart to hit that shipping minimum. When it came to MAC's website, I usually picked another tube of Strobe Cream or a new lipstick. On one occasion, I decided a red eyeliner seemed like a good idea...probably because the pencils were on sale or something of that ilk. I'd tested the MAC Chromagraphic Pencils in the nude shades before and found them to be pigmented and creamy, so I figured I'd have the same luck with Basic Red.

It turns out red eyeliner isn't exactly the best look for a professor. I wore scarlet wings to class once, received a snippy comment from a higher-up, and retired the pencil to the back of my collection. And at the time, I had such a huge collection that this one pencil was quickly lost in the mix.

I've since downsized my collection dramatically, all the while becoming more and more aware of what I do and don't need to achieve certain looks. Only two red pencils have stuck with me: NYX Auburn, which I've owned for far too many years but refuse to quit because it works so well with deep bordeauxs and bold crimsons, and MAC Basic Red.

Top: Besame 1941 Victory Red and 1920 Besame Red. Middle: MAC Chromagraphic Pencil in Basic Red. Bottom: MAC Scarlet Ibis and Besame 1931 Carmine.

Basic Red is the cleanest, most neutral red lip liner I've ever found. Some people say it leans a little warm, but honestly, I think it depends on which lipstick you pair it with. I wear it with all four of the shades above: the cool toned and saturated Victory Red, the more muted Besame Red (which appears outright purple-ish here because it's so muted in comparison to other three shades, but is clearly a soft, slightly blue red on the lips), the slightly warm Scarlet Ibis, and the orange-red Carmine. In every case, lining my lips with MAC Basic Red, then bringing the lipstick right to that pencil line always gives me the sharpest, fullest look I can get sans lip brush.

I've also worn Basic Red on its own with just a hint of balm or gloss on top, as in my Best of 2016 video. The formula is smooth enough to apply evenly to the lips and feel comfortable, but waxy enough to stay put. (The standard MAC lipliners, I find, are a bit too dry and flaky to be worn all over the lips.)

This truly versatile pencil deserves far more hype than it gets. That said, I'm not so much encouraging you to rush out and buy it as I am encouraging you to think very carefully about the products you already have. It's the stuff we tend to reach for automatically, without fanfare or fuss, that's truly deserving of "Holy Grail" status.

Friday, July 1, 2016

Moderate Stash: Mid-Year Replacements


One of the things I like to do that sometimes freaks people out is get rid of stuff I love. Yes, I know, that sounds counter-productive: you would think that you would find something you love, hang on to it, and never let it go. The thing is that I try a lot of stuff--I mean, a lot--and I sometimes come across products I love even more than a long-standing Holy Grail. So rather than cling to all of those products and deal with the over-flowing makeup drawers of my youth, I let the old favorites be replaced by the young guns.

This doesn't make the replaced products any less impressive, mind you. They were favorites and stand-bys for a reason, my go-tos, my "I'm in a hurry and I have to get a decent face on fast" staples. Two of the replaced products were actually repurchases. Yet again, I just don't want to have so much stuff that a sizable chunk of it goes unloved.

Here are the products I've decided to let go of and their replacements.


Josie Maran Coconut Watercolor Cheek Gelee is being replaced by BBIA Downy Cheek.

Why I love the Josie Maran blush: This is a unique blush in my collection because of its gel texture and stained effect. While this works on all skin types, I think it's especially perfect for dry skin; several people I've spoken to have been able to use it even when they were dealing with intense dryness caused by -30 degree weather or cancer treatment. It's very sheer, but easily built up for more color.

Why it's being replaced: The Josie Maran Coconut Watercolor Cheek Gelees come in several shades, but I find that all of the warm shades apply coral and all of the cool shades apply watermelon pink. By contrast, these Korean cream blushes from BBIA apply very much as the shade in the pan. And while the stark white bases make them less than optimal for anyone with a deeper skintone, they look truly lovely on very fair skin. The tipping point for me is their incredibly emollient formula, which is easy to spread on my cheeks even when they're at their driest and most sensitive.


Kevyn Aucoin Sensual Skin Enhancer is being replaced by NARS Radiant Creamy Concealer.

Why I love the Kevyn Aucoin concealer: If you want the most pigmented concealer you can find, it's hard to beat the Sensual Skin Enhancer. This creamy, little-goes-a-long-way base can cover the heaviest dark circles or the reddest blemish. The shade range is relatively broad, and the Sx01 shade is a great match for NC5-10 skintones like mine. (If Sx01 is too yellow for you, Sx02 is a hair darker and more pink.) This is at least my second pot of the SSE, as it's lovingly known, and the most popular posts on this blog outline tips for using it.

Why it's being replaced: The Sensual Skin Enhancer has a bit of a learning curve, and while I've figured out how to use it best on my skin, it's still a bit fussy. It's also a smidge too heavy for my undereyes unless I really sheer it out. The Radiant Creamy Concealer is simply an easier product to use, and I find myself continuously grabbing it instead because it works on my undereyes and does a great job of masking pimples. Also, I don't need a separate brush for the NARS product.


MAC Cream Color Base is being replaced by Glossier Haloscope.

Why I love the MAC highlighter: This is not my first pan of MAC Cream Color Base. Actually, I'm old old old friends with the formula, and I know I've run through at least one full pot of Pearl (an off-white pearl shade). This pot is Luna, a pure white that is very striking on fair and light skintones. While it has a cream formula, it's a bit "stiffer" than most, so it doesn't melt in your bag or feel heavy on the skin. This is yet another product that comes in a wide range of shades, including many different frosty finishes that can suit a wide range of skintones and a lot of very beautiful blush colors.

Why it's being replaced: I already have a stark white highlighter that beats the shit out of MAC Luna, and that's Becca Shimmering Skin Perfector in Pearl. Glossier Quartz is a very pale gold, making it a different color from all of my other highlighters. Also, as I've gotten older, my skin has gotten dryer, and stiffer creams like the MAC Cream Colour Bases are often pushed aside for more emollient products like the Glossier Haloscope.


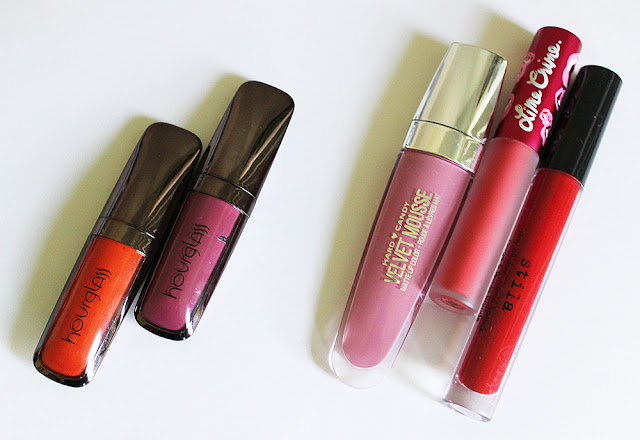
Hourglass Opaque Rouge Liquid Lipsticks are being replaced by several other liquid lipstick formulas.

Yes, that is a Lime Crime Velvetine, they were gifts, please don't hate meeeeeeeeeee!

Why I love the Hourglass lipsticks: Although the color range for this product isn't huge, it is decently varied, and you can get everything from a soft beige nude to a flaming red orange. These elegantly-packaged lipsticks are easy to apply and wear like iron; you can eat a massive meal with them on your lips and still have full, rich color after. Both of the shades I currently own, Riviera (orange) and Empress (plum) are beyond gorgeous.

Why they're being replaced: The ORLL formula has always been somewhat heavy and drying. While that was totally tolerable when I first tried these, the liquid lipstick market has since blown up, and some companies have now produced formulas that are just as pigmented and long-wearing, but also more comfortable. Competition to produce the best liquid lipstick and keep up with ever-evolving trends has also resulted in an absolutely stupefying range of shades. Finally, the Hourglass Opaque Rouge Liquid Lipsticks are rather pricey. It's now possible to get a high quality liquid lipstick for a fraction of the price.

Tuesday, September 15, 2015

5 Luxury Products I'd Repurchase Without Hesitation


Consider the Byronic hero. He was cynical, critical, and often sulky, the kind of guy you reluctantly cheered for because--while he was certainly a hero of sorts--he was still a major douchebag. But if there's one thing we can't fault a Byronic hero for, its his patience: those guys gave new meaning to the word "brood." They thought long and hard about damn near everything, so much so that their thoughts became 95% of every poem or play they were in.

I think this is why I've always kind of liked Byronic heroes. I am the very definition of a brooder, especially when it comes to my money: I fret and fuss over nearly every penny I spend. It's very rare for me to spend exorbitant amounts of cash on a single piece of makeup, because when I do, I'm often disappointed. (For example, I have yet to try a single $100+ foundation that could top MAC Face & Body, the large bottles of which cost less than $10 per ounce.) There's plenty of great stuff at drugstore and mid-end prices that kicks luxury's ass. But I have found some luxury items that are so wonderful, unique, and perfect-for-me that I would actually pay double for them, should the need arise. Here's a list of them.

Dolce & Gabbana Perfect Finish Powder Foundation, $61 -- Still one of my most popular reviews to date, this is the only powder foundation that has ever worked on my dry skin. The packaging is super luxurious: while it does get scratched up very easily, it's heavy and safe, and you can drop this powder numerous times without it breaking. The product itself is finely milled and can be layered heavily without making your skin look cakey. I'm especially happy about D&G's shade range; they're one of the few brands that creates shades for the very pale all the way up to the moderately dark. I prefer to use this as a matte setting and touch-up powder, but it works just fine as a foundation as well.

Shu Uemura Hard Formula Brow Pencil, $23 -- It's true that the Shu pencil isn't much more expensive than most mid-end options. But because it's quite hard to get in the states these days (which can add a high shipping cost), I consider this a luxury product. You may pay $23 for this pencil, but you're getting something that may very well outlive you. I've sharpened mine 5 or 6 times, and it still looks practically brand new because you get so much product and need so little to fill in your brows. As you can see by the damaged cap, this pencil is a well-loved part of my collection.

Becca Shimmering Skin Perfector in Pearl, $41 -- Yet another product that is seemingly bottomless! $41 is a hefty price for a liquid highlighter, but you get an entire ounce of product in easy-to-use, hygienic plastic packaging with a pump. And an ounce of this stuff really does last: I think I've had my bottle for 3 years now, and even after creating several sample pots for friends and using it regularly, I've hardly made a dent in it. You can use a thin layer of the SSP for a natural glow, pack it on for tons of shine, or even add a dash to your foundation for extra dewiness. It's simply amazing.

Hourglass Ambient Lighting Powder in Ethereal Light, $45 -- The second powder on my list is this beauty from Hourglass. I purchased my compact second-hand, never expecting the stuff to work out for me. Well...I love it. This is an off-white satin finish powder that makes a fantastic finishing powder for pale skin. It doesn't add shine or make you look matte, it just gives your skin a soft-focus finish. It's especially good for photography.

YSL Creme de Blush in Babydoll, discontinued -- I don't think I'll ever get over this product being discontinued, because it's the most perfect clean pink I've ever owned. The formula is a light, airy mousse that's easy to blend and does not disturb your foundation. The color brightens up my complexion without looking garish or overdone. YSL supposedly discontinued this formula in favor of the Kiss and Blush product, but I don't think it's at all comparable--the Creme de Blush is a thousand times better. I will probably cry when my pot runs out.

Tuesday, March 10, 2015

Obsessed: Kevyn Aucoin Creamy Moist Glows


If you've been reading my blog for even a month, then you probably know that I'm obsessed with the Kevyn Aucoin Creamy Moist Glow blushes. Any time people want a cream blush, particularly a cream blush that works well for dry skin, I give these a shout out.

First thing's first: Kevyn Aucoin has changed their packaging multiple times in less than 3 years. Hence, I have two Creamy Moist Glows in round pots with snap closures and two Creamy Moist Glows in square pots that open when you press the gold bar at the front. Before that, they were packaged in tiny screwtop jars like the Sensual Skin Enhancer--that was packaging my first jar of Pravella came in.

Out of all of these, the round compacts are the best: the mirror is sizeable, the closure is tight, and I never had to worry about it opening in my bag. The sad thing about the current square packaging is that, if something presses up against the compact just right, it'll open right up. It's rare, but it does happen, and it's a bit annoying.

On the bright side, the amount of product you get has increased: the round compacts contain 3.65 grams of product, while the current square compacts contain 4.50 grams of product. 


The formula of these cream blushes strikes a great balance between "emollient" and "lightweight." The product is smooth and creamy, but not thick a la the NYX cream blushes--you have to rub your finger across the product for a few seconds to warm it up, or really tap your brush in the pan, to pick up color. Fingers work best because they almost create a liquid texture, but they're fantastically easy to blend overall.

The finish is very natural and fresh. There's a hint of dewiness, as the product name suggests, but they never look wet. None of these contain shimmer, which is an absolute plus for me.

I currently own four shades. Going clockwise from the top left in the above image: Liquifuchsia, Tansoleil, Isadore, and Pravella. Liquifuchsia is a bright pink with definite purple undertones, and my newest acquisition. Tansoleil is the only peach blush I've ever truly loved, and I think the sizeable dip in the pan shows that. My softer pinks are Isadore, which has yellow undertones, and Pravella, a more pastel, neutral shade that's fantastic for pale skin tones.


Daylight on top, flash on the bottom.

These are my favorite cream blushes, end of story. They're pigmented, easy to blend, come in a great range of colors, are elegantly packaged, and last for hours on end. What's not to love?

RATING: 5 out of 5

And don't forget: there's only a week left in my current giveaway!

Saturday, January 17, 2015

VIDEO: Products for Lazy People

If you're like me and you hate putting effort in to most of your makeup, then this is the product list for you! I've compiled a short list of my all-time favorite things for people who are busy, on-the-go, or just plain lackadaisical.


Ding! Sound Effect: SoundFXForFree

PRODUCT LIST:

Paula's Choice Barely There Sheer Matte Tint, $20
RELEVANT POST: http://badoutfitgreatlipstick.blogspot.com/2013/10/review-paulas-choice-barely-there-sheer.html

Shiseido Ultimate Sun Protection Lotion SPF50, $39
Biore UV Perfect Milk SPF50, $10
RELEVANT POST: http://badoutfitgreatlipstick.blogspot.com/2013/09/liquid-gooooooooold.html

Chanel Illusion d'Ombre, $36
RELEVANT POST: http://badoutfitgreatlipstick.blogspot.com/2012/07/review-chanel-illusion-dombre-cream.html

Yves Saint Laurent Baby Doll Kiss and Blush, $40
RELEVANT POST: http://badoutfitgreatlipstick.blogspot.com/2014/12/review-yves-saint-laurent-baby-doll.html

Becca Beach Tints, $25

Josie Maran Argan Oil Infinity Lip & Cheek Creamy Oils, $18
RELEVANT POST: http://badoutfitgreatlipstick.blogspot.com/2015/01/josie-maran-slew-o-reviews.html

Kiss Me Touch Me Lip&Cheek, $8

Lipstick Queen Rose & Shine, discontinued???

Anastasia Brow Wiz pencil, $21
RELEVANT POST: http://badoutfitgreatlipstick.blogspot.com/2014/12/anastasia-brow-products-run-through.html

ELF Shine Eraser sheets, $1

L'occitane Lavender hand cream, $10
Soap & Glory Hand Food cream, $7

MAC Strobe Cream, $10
RELEVANT POST: http://badoutfitgreatlipstick.blogspot.com/2014/03/a-fotd-mini-tip-and-march-lemmings-board.html

RMS Beauty Living Luminizer, $38
RELEVANT POST: http://badoutfitgreatlipstick.blogspot.com/2014/01/review-rms-beauty-living-luminizer.html

Sunday, November 17, 2013

In the Land of Milk and Honey: DIY Mask


Ye olde yogurt-and-honey mask is pretty well known in the beauty blogosphere, which may make this post obsolete. But since many of my readers are personal friends and beauty newbies, I figured this write-up might be beneficial.

Well, that and I wanted to write about it. IT'S MY BLOG, WHATEVAH, I DO WHAT I WANT!

I use this mask primarily in the winter, when my skin is at its driest and most sensitive. The coolness of the yogurt is very soothing, and the lactic acid is a mild exfoliant. Honey is known for its antioxidants and moisturizing capabilities. I've also read about people using yogurt and honey masks to combat acne. As an added bonus, it's a cheap mask to make, as you're using two affordable items you might already have in your house (unless your one of those heathens who doesn't like plain yogurt or honey). I'm always amazed when I see how much "professional" yogurt masks cost. Why would I spend $50 for a little tub of your fragrance-laden junk when I can mix hundreds of applications for $10?

You can apply honey and yogurt to your face solo, but I prefer to mix them together: I want the benefits both provide, plus I want the honey to make the yogurt slightly "stickier" and less runny. I use roughly 2 parts Fage Total 0% Greek yogurt and 1 part real honey, mixing them well. Some people say you should use full fat Greek yogurt, but having used Fage's 0%, 2%, and full fat yogurts as masks, I have to say that there isn't much of a difference. Just make sure you use PLAIN yogurt, preferably Greek (for the thicker texture).


I apply a thick layer of the mask to my face (and sometimes my neck and chest) with my fingers. Again, the coolness of the yogurt is very soothing, and the whole mixture is thick enough that it won't slide all over the place. I will warn you, though, that while this mask feels truly beautiful on my face, it smells kind of icky.

It can also feel downright ugly on your face if you're sensitive to lactic acid. A friend of mine tried this once, not realizing she had that sensitivity, and described a painful burning sensation. Eeek! Always do a patch test.


Now, I've heard different opinions on how long you should keep this on. Some people say it's only effective for the first 10 minutes. Others claim it needs to sit on your skin for at least 30 minutes to let the antioxidants and acid do their work. I almost always go for a middle ground of about 20 minutes. By that point, the mask has dried up a bit and feels a little "tight" on my skin. It also turns somewhat translucent and starts to crack.

When it's time to remove my mask, I just step in to the shower, but if you're one of those people who showers in the morning, cleansing over the sink will do just as well. The yogurt goes slightly milky under the warm water (not surprising when you have a face full of dairy, I suppose), and even after it's been completely rinsed off, I feel like there's a slight film on my skin. Nothing painful or greasy or gross, just like an extra layer on top of my face. It disappears after I've cleansed. I leave the shower with skin that is brighter, smoother, and definitely glowier, and my moisturizer glides on like a dream.


 Some people will cover any extra yogurt-and-honey mixture and keep it in the fridge for their next mask. I personally prefer to sprinkle almonds on top and eat it. Trust me, it's delicious.

And there you have it! My secret to keeping my sensitive, combination-dry skin soft and glowy in the dead of winter. :)

Wednesday, September 25, 2013

Liquid GOOOOOOOOOLD!!!


Do you see this picture? Do you see my skin? It's not so bad, right? In fact, it's lookin' kinda nice! Man, it's a wonder what makeup can do for a person.

Now look a little harder. Notice anything? Maybe a bit of eyeliner smudged on my eyelid, or some dark circles peeking through my concealer? That's because I took this picture over 7 hours after I applied my makeup.

That's right, folks. The eyeliner smeared, the lipstick needed reapplied, but that face stayed flawless. And it's all because of that little blue bottle of Biore UV Perfect Milk.

If you know anything about Perfect Milk and its reputation, you're probably a bit confused as to why I've been using it. "But I thought your skin was combination-dry! You always talk about having cheeks like the Sahara!" Ok, yes, that's totally true: for most of the year, 90% of my face is dry, tight, and flaky, though I've managed to keep it under control with a proper diet and effective skincare. But I never refer to my skin as dry-and-dry-only because I do have some sebum production going on--hence, combination-dry. My eyelids are absolute oil slicks; thankfully, they respond well to eye primers. In the summer, my chin and the very center of my forehead are ever-so-slightly-shiny. And year round, my nose is the bane of my existence.

The nose. THE NOSE!!! How often have I wrangled with beautiful foundations that worked wonderfully on the dry parts of my face, only to be foiled by my ridiculously oily nose? I mean, it kinda comes in handy when I'm trying to see how a foundation would work on dry and oily skin. But when I'm just trying to go about my day? GAHD! You would not believe how many primers I've tried and how much matte powder I've pressed on to my shnoz, all to no avail.

But the Perfect Milk--recommended by the helpful folks at MakeupAlley.com--has completely changed that. An incredibly thin liquid with a vaguely powdery feel to it, Biore Perfect Milk spreads easily over my eyelids, nose, and the center of my chin without leaving a visible white cast. And it holds back the oil for hours. After about 4-5 hours, I have just the tiniest bit of shine on my nose, which is easily remedied with a dab of blotting powder.

Am I still blotting? Yes. Is my nose still shiny? Yes. But is my nose a disgusting oil slick that needs powdered every hour on the hour? Not anymore! Refer back to the picture at the top of this post: I applied my makeup at 10am, blotted at about 2:30pm, and took pictures at 5:30pm. GENIUS.


So it controls my oilies. But how does it play with the dry parts of my face?

Eh, not terribly. I certainly wouldn't recommend smearing this stuff all over your face if you're predominantly dry, but I have accidentally applied it to my temples and the inner parts of my cheeks--the driest portions of my face--on a few occasions with no ill effects. On a day-to-day basis, I apply the Biore UV Perfect Milk all over my nose and across my eyelids, then coat the rest of my face, neck, and hands with my beloved Shiseido Ultimate Sun Protection Lotion. And gaddammit, my skin looks and feels like satin for ages.

I also find that the Biore Perfect Milk:
  1. doesn't flash back in photos,
  2. feels super-comfortable and weightless,
  3. doesn't break me out or dehydrate my skin, and
  4. mixes perfectly with the Shi sunscreen and my MAC Face & Body foundation for an almost airbrushed look in flash photography--see above photo.


"There's got to be a catch!" you say. Well, of course there's a catch: it's sold in Asia and isn't readily available in American stores. But it's not expensive or difficult to get; I ordered mine from AlphaBeautyUK on Ebay and received it by the end of the week. You can't run out to Walgreens and grab a bottle for $5, but trust me, this stuff performs better than any American sunscreen I've tried at a comparable price.

Mega-oily people may also want to take a pass on this product. It's not that it won't do anything for you guys, but I'm pretty sure it won't do enough. If you're very, very oily, you should probably try the Biore UV Perfect Face Milk instead, which is sold in a white bottle and is reputably ten times stronger than the blue bottle version. (Hence why mostly-dry-me steers clear of it!)

I've been using this Biore sunscreen alongside my Shiseido for about a month now, and I don't think I could live without it. It's freakin' liquid gold.

(And if you don't get that reference, you should probably watch this video clip. Just sayin'.)


Wednesday, June 5, 2013

No, I'm not dead.

Once again, I did a month-long disappearing act. BUT! I come bearing gifts!


So shortly before my boyfriend arrived for an extended visit (aka before I dropped off the face of the Earth), I hauled 3 little things from Sephora and managed to use my points, coupon codes, my recent birthday, and the usual pick-3-samples deal to pull in a surprisingly full box. I actually panicked a little when I first opened the box and sifted through it because I couldn't find the Shiseido cottons; here they were wedged between some of the packing paper. Phew!


Here's all that I hauled, minus the monstrous pack of Shi cottons (a staple for me). I already know that Becca Radiant Skin foundation runs too dark and not-neutral enough for me, but I thought I could get the free sample for swatching purposes. My other free samples were the Soap & Glory body butter and the Hourglass primer, both of which are products I've heard loads about, but have also yet to use. Oops.

I also cashed in 100 of my points for a 1/2 oz sample of the Laura Mercier Radiance Primer. I've been liking this product, but only when I mix a dot of it in with my foundation; unfortunately, it's tinted, so if I just spread it around my face willy-nilly, I look like an Oompa-Loomp. The deluxe Clinique Black Honey lipstick sample was procured with a coupon code, and because I placed this order at the start of May (a few weeks after my birthday), I was able to get the free Benefit gift. Watt's Up is too dark/golden for my super-pale skin, unfortunately, but I'm not entirely hating the They're Real Mascara.

As for stuff I purchased: again, there were the Shi cottons, and I got the NARS pencil sharpener because it would take me over $50 for free shipping and work for my NARS Matte Lip Pencils. The real star, though, has been the Yves Saint Laurent (YSL) Creme de Blush in #9 Babydoll.


I was suckered in to buying this blush by Ruth Crilly, the model behind AModelRecommends.com. I'm not normally so easily swayed, but it looked so bright and beautiful and clean on her skin. Ruth also talked up the texture, saying that it was soft and light, and so easy to apply without disturbing the makeup underneath. I gave it a test...and it was instant love. The formula really is creamy, dreamy, and lighter than air.


It's also the perfect everyday blush for my super-fair face, as it doesn't contain a hint of brown and blends so smoothly in to my skin. I've worn this blush almost non-stop for a month, I kid you not; I had to force myself to try out NARS Cactus Flower instead of grabbing for the YSL. It's a definite staple in my collection.


Also, some updates on the red lipstick front! My most recent tips and tutorials for wearing red lipstick like a pro have been posted to Curvysta Haven, and my MAC Lady Danger lipstick giveaway is going on for a few more days!

Wednesday, April 17, 2013

Spring Fails, Faves, and Raves


It's always nice finding new products to love and to cherish for as long as my stash lives! The most impressive of the new foundations I've tried recently has to be the Tarte BB Tinted Treatment ($34, Sephora). This is my new oh-Hell-I'm-in-a-hurry base product, because it works on my pale skin right out of the tube, contains sunscreen, and provides a bit of coverage. It also works as a great base for powder foundation. I've loved the Kevyn Aucoin Creamy Moist Glow blushes ($24, Nordstrom) for at least a year now, but Isadore is the newest shade in my collection, and gah, is it gorgeous! It's a bit warmer/more "yellow" than what you see here, and it just looks so fresh and bright on my cheeks! L'occitane is a new brand for me, but after receiving a 1 oz hand cream in a swap, I was hooked. The products are moisturizing without being greasy, the 1 oz tubes are great for my purse or my work coat pockets, and you can roll said tubes up to get every last bit of product out! My mom and I have been particularly impressed with the L'occitane Dry Skin Foot Cream ($10, Nordstrom). Last, but not least, I have to give a shout-out to CoverGirl LashBlast Clump Crusher mascara ($7, drugstores), which has usurped Prestige My Biggest Lashes as my Holy Grail mascara. Case in point: tonight, my mom asked if I had worn false eyelashes to work. Good on ya, Clump Crusher.


Unfortunately, not everything can be sunshine and rainbows and kittens. A few of my most recent testers have failed me. The biggest disappointment was definitely the Rouge Bunny Rouge Highlighting Liquid in Sea of Clouds ($45, BeautyHabit). I've heard raves about this liquid highlighter from fellow makeup addicts and received two very kind, generous samples, but unfortunately, I just don't like it on my skin. It feels dry to the touch and looks like a bunch of glitter sitting on top of my skin, especially in photographs. I'm sticking with Becca Shimmering Skin Perfector for now. I've also heard great things about Rimmel Stay Matte Long-Lasting Pressed Powder ($5, drugstores); it's often compared to MAC Studio Fix powder. The only part of my face that REALLY needs mattifying is my oily nose...and on that count, this powder is better referred to as "Stay Satin for a Short While."  And while it might not surprise you, oh fair readers, that Maybelline Great Lash BIG mascara ($5, drugstores) is on my fails list, it really knocked me for a loop. I don't have the same pathological hatred for the original Great Lash that most makeup addicts seem to have, and I was really quite impressed with Lots of Lashes (which I bequeathed to my getting-back-in-to-makeup mom). BIG was unusually liquidy and wet, and it did little for my lashes while taking ages to dry. No thanks.


And now for a rave. I hate to admit it, but I have to: I am madly in love with the GLAMGLOW Tingling and Exfoliating Mud Mask ($69, Sephora). It's not only expensive, it's also pretty potent--it contains a physical exfoliant and a lot of pore-sucking ingredients--so I only use it once a month, or right before a big event. But lordy-be, does it do wonders for my skin! It exfoliates and brightens, gets the gunk out of my pores and shrinks them down until I'm practically pore-less, zaps zits to near nothing-ness, and makes it all feel smooth and supple. I will definitely repurchase this baby whenever I have the chance, even if I have to pay the full $69 next time (clearly I was an awful person and bought a tester from eBay first...). But if you're going to try it for the first time, be sure to check the ingredients list for possible allergens and obtain the smaller $20 jar first.

Monday, March 18, 2013

FOTD: Warm Dragon, plus a mini-rave

Traveling seems to wreak havoc on my skin, especially when I'm in a very different climate and I'm lacking my favorite exfoliant, running low on cleanser, etc. By the time I got back from North Dakota (yesterday), my skin was blackhead-laden, lackluster, blemish-ridden, and just generally icky. Luckily, I still had half of a sample packet of this guy:

Image from Sephora.com

My skin looked SO MUCH BETTER immediately after I used this mask; it was glowier, smoother, and most of my blackheads had disappeared. My rockin' huge chin zit also looked like it had been reduced, but I didn't necessarily attribute it to the mask until I woke up this morning and it was basically gone. And it didn't completely dry out my skin. LOVE IT! Officially my new favorite product for when my skin is shot to shit. Unfortunately, a full size jar of this product is almost $70, and I wouldn't use it enough to justify the cost. Some folks have informed me that there's a tiny jar available at some Sephora stores for $20, so I might hold out for the Friends and Family sale and hope they stock it online.

All moaning aside, the GLAMGLOW mask helped get my skin red-lipstick-ready, so I whipped out my beloved Chanel Dragon. It's normally a darker, more auburn red, like the color of my glasses, but I wanted to warm it up a bit, so I applied it over a warmer, lighter lipliner.


BASE: MAC Face & Body foundation in N1 + White, Kevyn Aucoin Sensual Skin Enhancer in Sx02

EYES: Too Faced Shadow Insurance, CoverGirl Clump Crusher mascara, Shu Uemura Hard 9 Formula brow pencil in Seal Brown, Milani Liquid Eye eyeliner in Black

CHEEKS: Cargo blush in Catalina, Makeup Forever Uplight #11

LIPS: MAC Chromagraphic pencil in Basic Red, Chanel Rouge Allure Lacque in Dragon [D/C]

Monday, February 25, 2013

Super-Early Spa Morning and FOTD


I rolled out of bed at 7am this morning. Not my normal routine, especially on days off when all I've got to do is clean and organize. But between my sister's phone alarm going off, my parents talking downstairs, and my cat loudly hacking up a hairball...well, I wasn't falling back asleep.


She may look cute, but I know her. That's her version of


Sigh.

But even when I'm up early, I don't like putting on my makeup before noon-ish unless I need it for work or an event. I'm in the habit of running errands or shopping in the afternoon, so I want my face to look fresh at that time. So what do I do in the morning?

SPA DAY, OF COURSE!


I was going to try my sample of the much-hyped GlamGlow mud mask, but then I realized that it could irritate my skin, and I REALLY wanted to wear makeup today! So I went with my old standby, the Queen Helene Mint Julep Masque. I cleansed my face before applying the mask so that I'd have a good, clean surface. I also decided to exfoliate and hydrate my lips, which are extra dry and flaky these days.


The Queen Helene mask is actually best for oily skin, but I still like to use it once or twice a month on my dry skin to squeeze out the gunk in my pores. I find that it's best to apply the mask to my least oily areas (my nose) and work out to my driest (my cheeks). I also leave it on for 10 minutes instead of the usual 15-20, as this is a somewhat drying mask.


I can't wear my glasses when I'm doing a mask, which renders me blind, so I decided to sit around and have a snack. Our grocery store FINALLY had a sale on Bolthouse Farm juices, which are some of my favorite snacks, and they're fantastic for you. Fixing my poor, tired skin from the inside out!


Can you see how quickly that thing dried on my skin?! Man oh man.

ANYWAY! I remove this mask with a cloth soaked in warm water, then I rinse my face with cold water. Obviously the "pore tightening" effect of cold water is only temporary, but it was preparation  for makeup!  Also, the cold water cools and smooths my skin, which makes the moisturizer I smooth on afterward feel extra nice.


Avon Nurtura has been my favorite face cream for three years now. It's thick, rich, creamy, and uber-moisturizing, but it doesn't feel tacky or heavy on my skin, nor does it emphasize my pores or break up my makeup.

My sample of the Bobbi Brown Hydrating Eye Cream, gifted to me by a kind MUAer, is so precious that I only use it maybe once a week. Today was a spa day, and I knew I wanted to wear heavier eye makeup today, so I had to pat some on to my undereyes and browbone.


ALL DONE.

I gave it all a few hours to soak in. And of course, I had to entertain myself with some classy stuff. Drag queens, anybody?


I may have screwed up that whole moisturizing routine by sitting in front of the space heater and baking myself. Erm. Oops?


BASE: Kevyn Aucoin Sensual Skin primer, Kevyn Aucoin Liquid Airbrush foundation in 02, Kevyn Aucoin Sensual Skin Enhancer in Sx02

EYES: Too Faced Shadow Insurance, CoverGirl Clump Crusher mascara, Shu Uemura Hard 9 Formula brow pencil in Seal Brown, Lancome Metallic eyeshadow in Pink Zinc, MAC Frost eyeshadow in Satin Taupe, MAC Frost eyeshadow in Vex, Makeup Forever Uplight #22, Milani Liquid Eye eyeliner in Black, Eyeko liquid eyeliner

CHEEKS: Kevyn Aucoin Creamy Moist Glow blush in Tansoleil, Makeup Forever Uplight #22

LIPS: Lancome Rouge In Love lipstick in Sweet Embrace, Revlon Super Lustrous gloss in Coral Reef


Tuesday, January 22, 2013

Tips for "No Makeup Makeup"


It's probably one of the most popular subjects in the world of beauty and fashion, and it's certainly one of the most sought-after YouTube tutorials: how do I make myself look amazing with makeup without looking like I'm wearing said makeup? And while there are a number of great how-tos floating about the internet, the fact of the matter is that what works best for you is really going to depend on your skintone, your preferences, and what you perceive as your "flaws." I do, however, have some basic tips for this sort of look, which always earns me loads of compliments, some of which are admittedly borderline creepy. (And I quote: "If I could, I would steal your skin, bottle it up, and sell it!" Erm...thanks?) Please remember that these are tips, not rules, and you are always encouraged to experiment and find what works best for you.

TIP #1: Be aware of your weaknesses. Try to push past them, but don't beat yourself up over them.

You've probably noticed that, despite the fact that this is supposed to be a makeup-less makeup look, I have rather strong brows. This is my weakness: it's almost impossible for me to put on my makeup and not give myself a strong brow. My eyebrows are naturally quite light, fine, and messy, and as my good friend Sara once mentioned, it is nigh-on impossible to walk out of the house without doing your eyebrows if you've gotten used to penciling them in. I am therefore well-aware that when I do this sort of makeup, I will almost always end up looking like I'm not wearing any makeup...except for heaps of brow pencil. And I don't beat myself up over that. At the end of the day, it's not so much about how well you replicate a certain look, it's about how good you feel when you walk out the door.

TIP #2: Always, always, always use products that work well for your skintone.

If you want to look like you're not wearing makeup, one of the worst things you can do is use a foundation that's too dark or a blush that's a completely unnatural tone (ie, a bright orange blush that stays bright orange on your cheeks--nobody blushes orange). This can be tricky if you're on the "extreme ends" of the skintone spectrum, ie very fair (like me) or very dark. Most foundations, concealers, and powders won't come in shades that suit your skintone, and most blushes and brow products will either be very difficult to blend out so that they look natural or just won't show up. Take the time to test a lot of products and figure out what works for you; it took me several years to find just a few products that matched me perfectly.

TIP #3: Watch out for "extreme" finishes, like extremely matte, extremely dewy, and extremely shimmery.

Your skin may naturally be quite oily or dry, but the trick with no makeup makeup is that you want to look like your skin is naturally balanced and healthy: not super-oily, but with that slight "glow of youth." And glitter is most certainly not something that just pops up on your skin! This means that, for the most part, you'll want to use products that are demi-matte or satin finish to best mimic the appearance of real skin; you can then add highlights with a product that is glowy, but not glittery, to the points where you need it. Exceptions to this rule would be people with very oily and very dry skin, who will need a more matte or more moisturizing base, respectively, to keep their skin looking nice throughout the day.

TIP #4: If you don't absolutely need it, don't use it.

I used foundation for the FOTD that heads this post because I was experiencing some skin sensitivity and therefore had a bit more redness to my face than what is usual. But for the most part, when I do no makeup makeup, I skip foundation altogether and just use a bit of concealer on my undereye circles and the occasional blemish. This is one of the hardest parts of no makeup makeup: it's meant to look "real" and "natural," so if you have to be willing to let your supposed "flaws" shine through a little. Almost nobody, without makeup, has a uniform skintone with no variance in color or texture, huge Kardashian-style eyelashes, or glossy coral lips. If your brows are already quite lovely, brush them in to place, maybe set them, but leave it at that. If your lips are naturally quite pigmented, just use a bit of lip balm. If you have freckles, let them shine through. Remember that the point isn't to look hyper-real and flawless: while beautiful, those types of looks always indicate that you're wearing makeup.

Products Used and Recommendations


1. I used a small amount of Too Faced Shadow Insurance ($18, Sephora) on my eyelids and undereyes to prevent them from getting super-shiny and oily. If you use a face primer, you can also run that over your eyelids, brows, etc. If the skin around your eyes is dryer, consider moisturizing it 10-15 minutes before you apply your makeup.

2. Because there are next to no color cosmetics in this look, I moved right on to perfecting my base. On this occasion, I used a thin layer of Vapour Organic Beauty Atmosphere Luminous foundation ($40, VapourBeauty.com) to even out my skintone. With this kind of makeup, it's best to stick with very sheer, thin foundations like this, then add concealer wherever necessary. Other foundations I've used for this sort of look include MAC Face & Body ($27-$33, MACCosmetics.com) and Revlon New Complexion ($10-15, drugstores). I also recommend using your figures to apply your foundation, as this tends to spread the foundation thinner (making it look more natural) and can make this look a quick no-brush option.

3. VOBALF evened out my sensitivity redness, so I just concealed my undereyes with a sheer, demi-matte concealer: Clinique Airbrush concealer ($19.50, Sephora). If I skip foundation, I tend to use Kevyn Aucoin Sensual Skin Enhancer ($45, Nordstrom) as needed; I have a tutorial for this KA SSE application method right over here.

4. I tend to keep a few mascaras around: a natural mascara, a layerable mascara, and a dramatic mascara. Obviously, the dramatic mascara is not an option for this kind of look, so I went with the layering mascara, which is also my HG: Prestige My Biggest Lashes ($6.50, Ulta). You can keep layering this product for uber-thick, full, black lashes, but I stuck with one coat and combed out the few clumps with my fingers. Always pick a mascara that's tried and true, one that you know won't smudge or flake on your lashes, as smudges and flakes are obvious signs that you're wearing makeup. My current favorite natural mascara is Estee Lauder Sumptuous ($22, Nordstrom); I would also recommend Maybelline Full n' Soft ($6.50, drugstores) and Bobbi Brown No Smudge Mascara ($24, Sephora).

5. Oh, brows, my weakness! I used my beloved La Femme brow pencil ($1.50, MakeupMania.com) and went very full-on, but because this is a harder pencil, you can get quite a natural look if you use a lighter hand. The Shu Uemura Hard Formula brow pencil ($24, ShuUemura-USA.com) is another great option if you prefer a pencil. If you just need a bit of help, considering using a matte eyeshadow to fill in gaps, or just add a hint of brow gel, which--

6. --my favorite is the Anastasia Clear Brow Gel ($21, Sephora). I keep a mini-tube in my purse at all times! It smells awful, but no other brow gel is able to groom and hold my brow hairs so well without making them feel crispy. They also make tinted versions.

7. When it comes to blushes, I will almost always recommend a liquid formula for this kind of look, since they tend to be sheerer and more blendable. My favorites are the Becca Beach Tints ($25, Sephora). If you don't plan on using a highlighter, certain cream blush formulas can add a bit of glow to your cheeks, like a Kevyn Aucoin Creamy Moist Glow ($24, Nordstrom); just use a very light touch, as many cream blushes are opaque and saturated with pigment. If you have trouble getting liquid blushes to show up on your skin, go for a buildable, matte powder blush that's easy to blend out; Sleek Blusher ($6, SleekMakeup.com) and Lancome Blush Subtil ($30, Sephora.com) are some of my favorite formulas.

8. I always finish off with a highlighter that's glowy, but not shimmery, and hard to overdo. In this case, I used the Becca Shimmering Skin Perfector in Pearl ($41, Sephora). (This is actually a little sample pot that a very kind friend sent me!) If you prefer a powder, consider the Kevyn Aucoin Celestial powder in Candlelight ($42, Nordstrom). MAC Cream Colour Bases ($18.50, MACCosmetics.com) come in a number of highlight shades, if you're looking for something more affordable, but be forewarned: these are buildable and can be overdone.


I've posted two similar no makeup makeup looks with breakdowns/tutorials in the past, so I will link those down below. Here's hoping these posts have helped!

Hyper-Glow post
No-Makeup-Makeup/Minimalism