Showing posts with label product: BB cream. Show all posts

Wednesday, July 20, 2016

Revisiting the Tarte BB Tinted Treatment Primer


The Tarte BB Tinted Treatment Primer (I hate writing that damn name) was a long-time love of mine when I was in graduate school, slash, immediately outta there. Obviously, it was a huge bonus that it was fair enough for me out of the tube, plus slightly yellow in undertone and easy to apply with fingers. But my main attraction to the product was the lightweight feel and the all-physical SPF30. When I got rid of my half-full tube, it was only because the sunscreen had expired.

And then I forgot to repurchase it. Whoops.

Three years later, a lot of new foundations are due to come out and my skin is dryer than it was several years ago. I figured this would be a great time to re-test an old favorite. I didn't treat this like a formal review when testing or photographing, so I won't be giving this product an official score, but I hope you'll still find this post helpful!


Let's talk about this BB cream at a base level (ahahahaha!) first. For $36, you get a full ounce of product that's available in four shades, ranging from very light to slightly dark. I'd love a darker shade in this line, especially since it's hard to find a decent physical sunscreen if you're ebony skinned, but I'm overall okay with the price and the base shade range.

What does make me tilt my head is the claim that this is some kind of "treatment." Above are the ingredients plugged in to Cosdna; you can see the two sunscreens at the top and everything else below them, all fitting on one screen. On the one hand, it's great that you can see a full ingredients list on one page. It's short, and there's not a massive amount of irritants here, so if you're sensitive skinned (and not allergic to silicones), this might be a great option for you. That said, there isn't anything on this list that actually treats the skin. Tarte claims that people who used this product felt like their skin was smoother and softer, but that's probably due to the massive amounts of silicone that give this primer its slip, not any actual treatment.

You'll also notice the diamond powder listed on this. In a few of the photos where I'm wearing this product, you can see tiny white flecks on my face: this is most likely the diamond powder shining through. Annoyingly, it's often visible in HD photos, but in standard definition and selfies, it's invisible and adds a soft glow to the skin. Just something to note if you plan on being photographed wearing this.


The coverage on this product is quite sheer, but that makes sense, since it's technically meant to be worn under another product. If you have a powder foundation, for instance, and you want to add some slip and SPF to your skin before applying it, this is your product. That said, I have always worn this product on its own without any major issues. I find that this provides enough coverage to make my face almost match my much paler neck.

As mentioned, the Tarte BB primer has a very silicone-heavy texture, and you can tell when you touch it. It has a powdery sort of feel and it smooths over the skin easily. I find the feeling of silicone-y bases very weird when I'm rubbing them in, but to be honest, it makes this product completely weightless. Wearing this makes me feel like I'm wearing nothing at all, so it's a prime summer option in that respect.


Unfortunately, this product clings a bit to my dry patches, making my skin look extra-flaky. It's not as bad as some foundations, and it's only visible if you're within a foot of my face, slash, photographing me in HD. That said, this BB cream will probably look much worse when it's not so warm and humid out. Also, I have certainly found foundations that don't emphasize my dry skin--there's no real need to cling to this one.


I will note that plenty of Cinema Secrets Moisture Spray softens this product up a good bit, though again, I don't think that will be enough when winter rolls around. And if you are not very dry skinned or very oily, I think you might like this product. In fact, I'd recommend it to people with more balanced skin who are looking for a sheer, light SPF product. It's just not a good fit for my skin these days.

Natural light on top, flash on the bottom.

Before I return this tube to Sephora, here are some comparison swatches! All of these products are roughly the same depth, but have different undertones. NARS Sheer Glow in Siberia has strong yellow undertones, while MAC Full Coverage in NW10 has strong pink undertones. Buxom Show Some Skin in Tickle the Ivory and the Tarte BB in Fair are very similar, but I'd say that the Tarte is a hair more neutral and the Buxom is a little more yellow.

PS: By this time tomorrow, I should  be hanging out with not only my partner, but also my new niece. Again, posts may become sporadic for a while. Thank you for your patience!

Thursday, January 28, 2016

Swatches of the Missha Signature Complexion Coordinating BB Cream

I've recently begun admitting a few things about myself: there are more ingredients that break me out than I want to admit to, and most Korean BB creams and foundations are too heavily fragranced for me to tolerate them. This doesn't make them bad products; it just means that there are plenty I should stop trying to use. At the top of my list is the Missha Signature Complexion Coordinating BB cream: I bought it in such a flurry after seeing the shades that I completely neglected to read the ingredients. Now that I have read them, I know that this stuff will not work on my face.

That being said, I think I can still help a little by providing swatches of the product!


This BB cream comes in three shades: 1 White, 2 Beige, and 3 Honey Beige. I got sample packets of both the White and the Beige shades. The White seems like it's going to be a corrector, a la MAC Face & Body White or Yaby Daisy, but it's actually meant to be a face-brightening product that "adjusts to your skintone"--in other words, the true color is revealed when you rub it in to your skin. I'd say that the White blends out to about NW5-10 in MAC, and Beige is about NW15-20 in MAC. You can blend these two together, but weirdly enough, I find that I don't really get an "in-between shade"; it seems to stay in White's NW10 range.

Friday, January 9, 2015

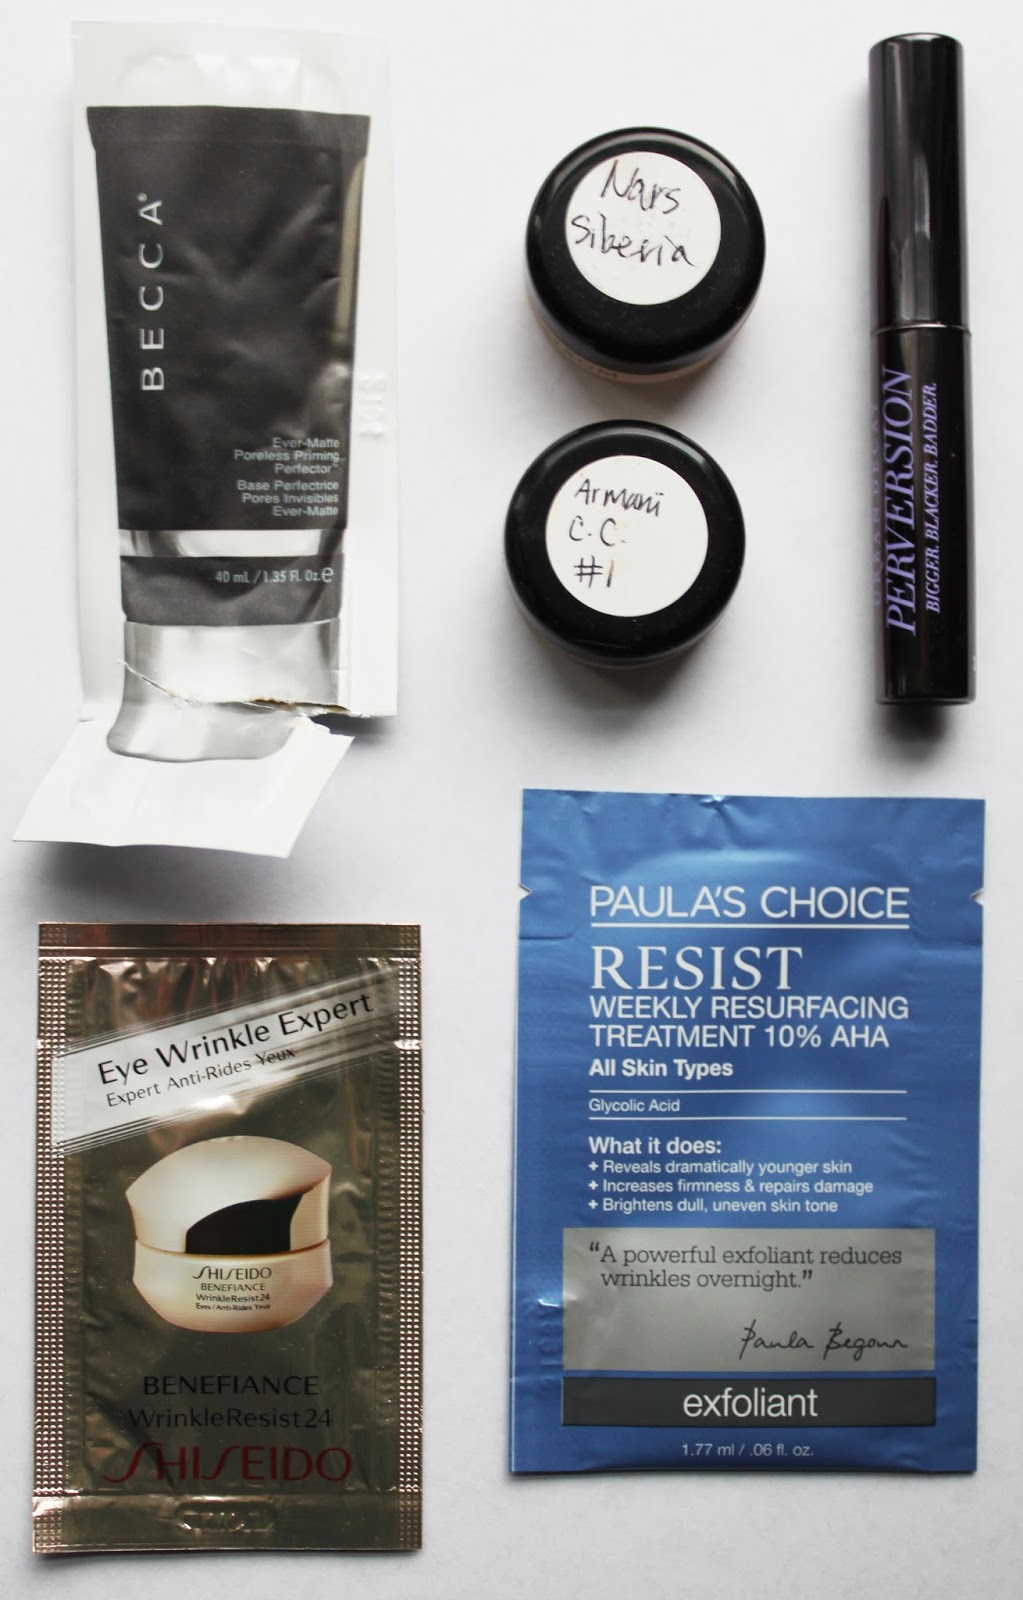
Sample Rundown #4


It's time for another Sample Rundown! I've got plenty of skin stuff here...and unfortunately, plenty of disappointments. While some of these products just didn't suit my tastes, I honestly think that a good half of them are just crap. Let's get on to the mini-reviews!

Becca Ever Matte Poreless Priming Perfector -- While my skin is 95% dry, my nose is incredibly oily. This means that products that look good on the dryer parts of my face are almost always going to melt in to nothingness on my nose. I was therefore inspired to test this cult classic primer on my nose, as I heard it was one of the most mattifying things on the market. Can I just say...wow, what a crock! First of all, you get hardly any product in the sample product: I was barely able to get 3 uses out of it, using this JUST on my nose. I also got zero oil control out of it; instead, it made my foundation pool in to my pores. And I don't even have big pores! A total fail for me.

NARS Sheer Glow in Siberia -- I received several samples of this product, plus a fabulous full bottle, from very kind people. The good news: it was a great match for my neck. The bad news: this formulation didn't work great on my skin. It melted off of my nose, and it looked a bit dry and cakey on the rest of my face. I had to do a LOT of doctoring to get this product to work on my face for more than a couple of others. I'm always upset when something people kindly gave me doesn't work for me, and I'm doubly upset that this was such a great shade for me, but otherwise unusable. :(

Armani Luminesscence CC Cream in #1 -- I labeled this post with "product: BB cream" because I refuse to make a new tag for CC creams. I'm sure you all still love me. ANYWAY! I'm on the fence about this product. On the one hand, it gave me light, slightly glowy coverage, was a good N10-15ish shade, and sat comfortably on my skin. It also photographs nicely, despite the SPF35. On the other hand, it seemed to lack staying power on most parts of my face. I found that this product transferred very easily if I didn't powder or spray it down. In the end, it's a nice CC cream, but it's not worth the huge price tag.

Urban Decay Perversion mascara -- Talk about a divisive mascara! I know some people really adore this, and I can see way. It gives some length and absolutely crazy volume. It's also one of the blackest mascaras I've ever seen. Unfortunately, it's waaaaaay too wet and messy for me. Every time I applied it, my lashline and lids were a total mess, and I had to do major clean-up. Also, if I didn't let it sit for 5 minutes before I touched my lashes, they'd clump together and get spidery. I just don't have the patience for this product.

Shiseido Benefiance Wrinkle Resist 24 Eye Cream -- In all fairness, I don't think most eye creams are worth it. Next to nothing will actually get rid of undereye circles, caffeine will only reduce puffiness for a brief period of time, and I get plenty of moisture from my face cream. That said, I enjoy the indulgence from time to time; I've been nursing a sample of the Bobbi Brown Hydrating Eye Cream for almost 2 years now. This particular cream just didn't impress me. It had a slightly tacky feel on my eyelids, it smelt strongly, and it made my eyes water. On the bright side, I got a week's worth of usage out of this sample packet. Very generous!


Paula's Choice Resist Weekly Resurfacing Treatment (10% AHA) -- I've been using this chemical exfoliant once a week for almost 3 months now, and I'm pretty much in love with it. It's made my skin smoother, more glowing, and less red. First, let's get the bad out of the way: it smells awful, and it feels incredibly sticky and gross on my skin. I rinse it off after about 15 minutes, then apply my moisturizer, in part because my skin is sensitive and I don't like to leave an active on it for too long. But even if my hide was tougher than leather, I'd remove this AHA, because I just hate hate hate the way it feels. So grippy! So sticky! It also makes my skin look a bit worse (see above image) for a few hours, which is why I would never use it before a big event. My skin feels incredibly soft to the touch, however, after just an hour, and I wake up looking fantastic. Some people use this more than once a week, but honestly, "every Friday night" has worked just fine for me!

Thursday, April 10, 2014

The Foundation Master Tip Post


Foundation has been one of my main concerns for about 3 years now, especially since I no longer "tan" up to MAC NW15 and favor a more natural-looking product than I did in my youth. But I'm not the only person who has bases on the brain. Makeup forums are flooded with questions from posters with strong pink undertones, painful skin conditions, and the deepest ebony skintone who can never find their perfect foundation. Dense cover-ups like Kevyn Aucoin Sensual Skin Enhancer and Laura Mercier Secret Camouflage have such a steep learning cover that endless tutorials on how to use them properly are written and recorded. People know exactly what they want from a foundation, but aren't sure how to walk up to a counter and eloquently request a medium-coverage, demi-matte liquid foundation with neutral shades, a high SPF rating, and no glitter or shimmer. But most of all, makeup lovers are always looking for new ways to apply their foundation and make it look unbearably beautiful.

So I decided to hit the books--literally--and flip through my countless beauty tomes to provide some expert tips and suggestions. I've also watched plenty of videos from makeup artists and nagged many a beauty blogger and forum poster to get their own quirky tricks-of-the-trade. Finally, I've added my own 2 cents here and there, drawing knowledge from my 10+ years of wearing makeup (and looking utterly cake-faced for most of that decade).


BEFORE WE GET IN TO IT...

I find that there are some products people always mix up or misunderstand: in skincare, exfoliant, cleanser, and makeup remover cause confusion, and in makeup, there's a lot of debate about foundation, concealer, BB/CC creams, and tinted moisturizers. As a general rule:
  • Foundations are bases that you build on top of--think of the foundation of a house. They're primarily made to even out your skintone and cover minor flaws. Concealers do just that: conceal. Most are higher coverage than foundations and are used to cover up acne, scars, undereye circles, and major discoloration. Tinted moisturizers are essentially very sheer foundations; most contain some skincare benefits and sunscreen, but at the end of the day, they can't replace your regular skincare. BB and CC creams are like foundations with added skincare benefits if you're in Asia; in the western world, they're usually just tinted moisturizers with a snazzy marketing campaign.
  • An exfoliant gets rid of dead skin cells so that your skin is smoother. It does not clean your skin or remove makeup. A cleanser cleans your skin and removes dirt, excess oil, and so forth; very few are designed to remove makeup. A makeup remover does just what you think it does: it breaks down makeup and gets it off of your face. Generally speaking, if you wear makeup, you'll need a makeup remover AND a cleanser, not just one or the other.
  • If you're unsure about what an undertone is, ie, "cool," "olive," check out this great source for starters.
And as always: these are only suggestions. If there was one resounding makeup gospel, we wouldn't have slews of makeup artists and books espousing different opinions on how to pluck a brow or clean a face. Always do what works best for you!


FINDING A SHADE MATCH OR A FORMULA


1. "Where you test foundation is not on your face, but on the side of your neck...you want the foundation to be continuing from your neck" (Mary Greenwell). If you match to your face, you're most likely going to get the "floating head" look, where your face is several shades darker than the rest of you (Lisa Eldridge).

2. If you test foundation on your wrist, you're again testing it on a part of your body that is usually exposed to the sun and will more often than not be too dark to ensure an accurate match.

3. "Personally, I match to the chest. In Caucasians, the neck is often the lightest part of the body, and in some ethnicities, it tends to be the darkest part. Obviously, use common sense, but I've found the chest to be a better guideline for tone and depth" (mikmik90).

4. "NEVER buy a foundation from a store match." Take home a sample and try it out for a day or two, making sure you check it in different lights (natural, artificial, fluorescent) to see if it really matches you (HanSoloShotFirst).

5. Experiment with different application techniques or primers before you give up on a foundation (NanRX). For example: I hated MAC Face & Body when I applied it with a brush because it looked streaky and gross, and sponges just soaked all of the product right up, but when I apply it with my fingers, it looks PERFECT. Check this post for more of my MAC Face & Body tips!

6. "Just because you're fair doesn't mean you're cool-toned! A lot of super-fair people just grab the lightest shade in the range assuming it's right, but often that shade is a pink-toned one. Take the time to find out if you are cool or warm, and match your foundation appropriately" (rc630).

7. "If you ever have your makeup done in a cosmetics department or makeup store, take a mirror and go out into the daylight to see the truth. Often the lightest in makeup boutiques  are not neutral. Once you get home, you may look completely different." (Kevyn Aucoin, "Face Forward")

8. "The concept of texture applies not only to the look, but to the feel of makeup too. Typically (though not always), matte makeup products contain little if no oil. So products of this type are  well suited for those who tend toward oily skin. People with normal skin often favor water-based products with only a hint of added moisture. Those prone to excessive dryness lean toward oil-based cosmetics. But don't let the texture of your own skin keep you from experimenting with seemingly incompatible products." (Kevyn Aucoin, "Face Forward")

9. "To make sure you select the right color foundation, choose three shades that you think are about right and streak each one over your face and under your jaw line. Only one will completely disappear on your skin, and that is the color you should buy." (Juliet Cohen, "Vogue Makeup")

10. "Do not use pink-based foundation to try to make yellow-toned skin look pinker, or vice versa. Instead, choose a foundation that matches your skin and let your color cosmetics do the work afterwards." (Juliet Cohen, "Vogue Makeup")

11. "If your foundation formula is too oily, try adding a few drops of astringent. This will make the foundation a bit sheerer, but does cut down on the oiliness." (Kevyn Aucoin, "Making Faces")

12. "If, and when, you use foundation all over the face, be sure to blend into your jawline, and slightly onto the neck. Otherwise, you'll have a distinct line between the two, and it will make you look like you have a mask on." (Kevyn Aucoin, "Making Faces")

13. "As with anything in the cosmetics industry, it is important to take a step back and remove yourself from the marketing hype – i.e. THE BULLSHIT. As soon as you buy into the bullshit, you will be let down and you will have product issues.  Everyone needs to be realistic, and understand that not everything will work for you.  Heck, products may even make your skin worse" (BernB).

14. Don't be afraid to mix foundations to get different shades, textures or finishes, and levels of coverage (Lisa Eldridge).

PREPPING THE CANVAS


1. Your skin is an ever-changing organ, and unless you're some kind of magical unicorn, your diet is going to impact that organ. Drink plenty of water and try to eat lots of fresh vegetables and fruits. Also, be aware of how certain foods or nutrients impact your skin. I find that low-fat dairy products make my skin look more luminous and feel more moisturized and plump, but some people actually break out from dairy. Soy and refined sugars are also common acne triggers.

2. "You are not a peach; get that fuzz of of your face! Fresh shave = best foundation application ever" (HeavensDevil).

3. Almost every makeup artist, YouTube guru, and beauty lover will tell you that regular exfoliation is an absolute must for smooth foundation application. Just be sure to use a gentle product; abrasive scrubs like the St. Ives Apricot Scrub can do more harm to your skin than good, especially if you scrub them on with lots of pressure. AHAs and BHAs are good chemical exfoliants (ATSV); if you really want something physical, try an Asian konjac sponge.

4. By the same token, don't over-exfoliate. Very few people need to have dead skin cells scrubbed off every day, especially if you use a physical exfoliant or a potent chemical one. Twice a week is enough for most.

5. "Even oily skins need moisturizer, because a moisturizer helps seal water into the top layers to keep skin soft and supple. However, don't load the skin down with a very heavy formulation. Instead, choose a light, watery fluid, as this will be enough for you." ("The Ultimate Beauty Book," by Norton, Shapland, and Wadeson)

6. "If you're unsure of your skin's oily and dry areas, press a tissue to your face an hour after washing it. Any greasy patches on the tissue signify oily areas." ("The Ultimate Beauty Book," by Norton, Shapland, and Wadeson)

7. "If you have combination skin, take this tip from the beauty salons and use two [products]: one suitable for oily skin and one for dry skin. Just apply each one to the relevant area that needs it." ("The Ultimate Beauty Book," by Norton, Shapland, and Wadeson)

8. The skin around your eyes is especially thin and delicate. Do not pull or rub at this skin! If you're applying product around your eyes (concealer, eye cream, etc.), use very gentle patting and sweeping motions.

9. "Make sure you give moisturizer time to sink in before you start applying your makeup" ("The Ultimate Beauty Book," by Norton, Shapland, and Wadeson). Makeup spread over freshly-applied moisturizer or eye cream can slide around and crease. You may want to reverse this tip if you have very dry skin and/or are using a super-matte product, however, as the added moisture can make the foundation apply more smoothly.

10. "A lot of people apply [hydrating eye creams] very incorrectly...don't start [under your eyes] where the darkness is. The idea of an eye cream is that you're keeping the area that is very thin at the corners of the eyes hydrated. So when you start, you want to tap around [the outer corner of the eye] and move inward...start on the outer corners and go around that orbital area" (Josh Collier).

11. Mix 1 tablespoon aloe vera gel with 1 teaspoon of silica powder (both ingredients should be available at places like TKBTrading.com and CoastalScents.com). Store the mixture in a small tub with an airtight lid. Apply a small amount of this mixture to your face before applying your foundation to prevent oil breakthrough (andreajunelle, BernB, and rayvnna).

12. "It is important to remember, mineral foundation is just minerals and pigment.  It doesn’t have ingredients to control oil; it doesn’t have ingredients to make it long lasting.  You must incorporate other products to provide these benefits" (BernB).

13. You need to wash your brushes thoroughly and regularly, and powder puffs should be replaced every few months, to keep your face clean and your application flawless. I cannot understand people who never clean their brushes or replace their puffs--you wouldn't use the same fork to eat all of your food and never wash it, would you? For help on how to clean your brushes, check out this great video. The actual soap or cleanser you use to clean your brushes is personal preference, but I personally have always used the Dr. Bronner's bar soap or baby shampoo.


"NATURAL" APPLICATION TIPS, TRICKS, AND IDEAS


1. "By massaging in to the face, I'm going to get a beautiful finish...I never use brushes" (Mary Greenwell). Try rubbing and patting your foundation on with your hands. This tends to press the foundation in the skin and warm it up more quickly so it really "melts in."

2. I often get asked how I make my foundation look so "perfect but natural." The trick is...I use very little foundation. I'll usually just pour out a dime-sized amount of MAC Face and Body (a very sheer foundation) all over my face and the top of my neck, then I'll put a bit of powder on my oily areas and dot concealer on my undereyes and my zits. That's it. I'm not wearing a mask. Try applying half as much foundation as you normally do and see how that works for you. As per Kevyn Aucoin: "I prefer little or no foundation for everyday use. Too much foundation can give the face an artificial, heavy look." ("Making Faces")

3. "I have this sort of peeve with contour and highlight. A lot of people are obsessed with it lately...and I'll just be honest, I think it looks kind of silly outside of photoshoots because it's designed to make you look a certain way in a photograph. But when you're in a real life, having all of this brown around [the perimeters of your face]? A little bit of contour is fine, but c'mon!" (Dustin Hunter)

4. "Always work from the center of the face out" (purplecouch). For many people, the most discolored parts of the face are in the center (nose, chin, middle of forehead, apples of the cheeks), and the skin at the perimeters is often the cleanest and "prettiest" (temples, back of the cheeks, etc).

5. "If you are not a dab hand with foundation, applying liquid [products] with a damp sponge (make sure all the excess liquid is squeezed out first) is the best way to get even coverage. Fingertip application can result in a streaky finish if you are not extra careful." (Juliet Cohen, "Vogue Makeup")

6. "Remember that it is always best to start with a little foundation and build up coverage slowly, rather than put on too much and have to remove it." (Barbara Daly quoted by Juliet Cohen, "Vogue Makeup")

7. If you want to make your foundation more sheer, mix a little bit of that foundation in to your favorite moisturizer.

8. "Most foundations sit on top of the skin a minute or two before soaking in. This is at the root of my theory about why so many women are averse to foundation. It looks weird at first--you have to give it a minute!" (Molly Young)

9. Be careful about how many layers of product you're putting on different parts of your face. Too thick of a layer of makeup will look cakey and fake in daylight. For example: if you plan on using an undereye concealer, you probably don't need to apply foundation under your eyes.


"GLAMOUR" APPLICATION TIPS, TRICKS, AND IDEAS


1. Cream foundations are usually your best bet for very full-coverage. They also tend to photograph well.

2. Drag queens are a great source of inspiration and information when it comes to caking it on and looking good. Two important tips you can learn from a drag queen: let thick cream foundations and concealers sit on your face for a few minutes so that the heat of your skin will warm them up and make them easier to blend; this is called "cooking." If you do your base first, apply a thick layer of loose powder under your eyes; this will catch eyeshadow fallout (Manila Luzon). You can dust it away when you're done.

3. Too dry-skinned or worried about caking to do the drag queen powder trick? Just apply your eye makeup first. Clean up the fallout when you're done, then go on to your base.

4. "[Color correctors] work wonders to disguise uneven pigment, or to calm down the appearance of high coloration. Use them sparingly underneath your foundation, and you will be amazed at the results...green counteracts redness. Use on blotchy patches and also to disguise broken veins. Yellow can seem a godsend after a late night because it has an 'anti-fatigue' action that counteracts dark circles under the eyes. Lilac gives a welcome lift to sallow skin and helps to eradicate a dull complexion." (Juliet Cohen, "Vogue Makeup")

5. "Concealer can be mixed with creme or liquid eyeshadows, creme blush, or lip colors to pale down or dilute the application." (Kevyn Aucoin, "Making Faces")

6. Many long-wearing and full-coverage products have a matte finish. If you want more glow, try spritzing your face with a finishing spray. These sprays add some glow to the skin and can cut down on how powdery or "flat" you look; as an added bonus, most of these sprays have ingredients that increase the longevity of your makeup. Skindinavia makes several formulations, and Makeup Forever Mist & Fix is great for a high-shine finish. Drag queens have been known to coat their faces in hairspray (not recommended) and theater makeup sealants (Mehron, Kryolan, etc).

7. If you want your skin to look extra-glowy and almost soft-focus in flash photography, try layering a luminizing lotion like MAC Strobe Cream under your foundation

8. Instead of applying your moisturizer/primer, then foundation, then powder, try rearranging the steps, especially if you have oily skin. "We've been told to powder after foundation, and this makes total sense. And it works. But what works really well is to powder before foundation. After moisturizer and primer, then you powder. Then you apply foundation over the powder! This will fill in pores [and] keep your foundation in place all day. If you have dry skin, you will not need to powder your foundation after. You can just leave it. For those with very oily skin, you will need a touch of powder on the t-zone only" (Wayne Goss). People with dryer skin may get a glowier, less cakey look if they apply a little moisturizer on top of their makeup (The "Pixiwoo" Sisters).


ACNE, AGING, AND OTHER CONCERNS


1. Having acne doesn't mean you need a full-coverage foundation. For most people, a very light base all over will work best; then you can conceal the spots with a stronger foundation or a concealer (Lisa Eldridge).

2. "As someone who has 'ruddy' skin, I would say never try to match the light undertones of the skin. If you slap that light color all over your face, people will ask if you are sick. Instead, look for a NEUTRAL color half way in depth between the base color and the red areas. This will prevent you from looking washed out" (LyrA236).

3. "Always apply [concealer] with a fine-tipped brush...and place it exactly on top of [blemishes], not on the surrounding skin. If there is not a concealer to match your foundation, opt for one a shade lighter. A concaler that is even one shade too dark will serve only to highlight an imminent eruption." (Maggie Hunt quoted by Juliet Cohen, "Vogue Makeup")

4. "Older women often think that their foundation has changed because it doesn't suit them anymore. What they don't realize is that often it is their complexion that has changed, for example become paler, as they have aged. It is important not to get stuck in a foundation rut." (Stephen Glass quoted by Juliet Cohen, "Vogue Makeup")

5. "Remember to slather any exposed areas of your body with sun protection at all times, even in midwinter. Sun exposure is the single most important factor in premature skin aging." (Juliet Cohen, "Vogue Makeup")

6. "If you feel you can't use any products on your skin without irritating it, cleanse with whole milk and moisturize with a solution of glycerin and rosewater. These should soothe it." ("The Ultimate Beauty Book," by Norton, Shapland, and Wadeson)

7. "If you are unlucky enough to have genuinely sensitive skin, avoid products that contain known allergens such as fragrance, live plant extracts, or lanolin." (Juliet Cohen, "Vogue Makeup")

8. You can temporarily reduce a pimple's redness by holding an ice cube against the blemish, or by dotting on some anti-redness eye drops.

9. Sheets and pillowcases are getting a lot of press with regards to skincare. Two common tips: wash your sheets and pillowcases regularly to remove oils and dirt, thereby preventing acne and breakouts, and try using a silk pillowcase to prevent neck and face wrinkles.


REMOVING IT


1. If you use any sort of long-wearing product, you'll probably need an oil-based makeup remover to break down the product and get it off. Water, mild soaps, and basic cleansers are usually not strong enough to remove all of the product, and leftover product can lead to clogged pores and breakouts.

2. Don't be rough on your skin, especially the delicate skin around your eyes. Just let the makeup remover soak on your face and break down the product, no need to rub (Lisa Eldridge).

3. Always wash your hands before you wash your face. You don't want to be rubbing dirt and oil all over your "cleansed" skin.

4. Avoid washing your face or showering in super-hot water. It can dry out your skin and cause broken capillaries. Go for warm water for makeup removal instead, then switch to cool or cold water for your final rinse to make your skin feel fresh and smooth.

5. STOP SLEEPING IN YOUR MAKEUP!!! Remove it and remove it COMPLETELY before you crawl in to bed.

6. "Wipes are not the same as cleansing. I meet so many clients in my line of work that tell me, 'Oh, you know, I'm breaking out from my foundation, I don't know why, I don't know what it is. I heard it was so good!' The first thing I always ask is not 'what foundation is it,' but 'how do you remove it'. And most of the time? 'Oh, I use a makeup wipe!' 'Okay, well, what do you cleanse with after?' 'I don't--isn't that the same thing?' It is NOT the same thing. [Makeup wipes are] not a cleanser, [they are] a makeup remover; those are two different philosophies of skincare, two different steps. You do NOT cleanse your face with a wipe, you remove your makeup with a wipe, and then you cleanse after." (Josh Collier)

7. Cetaphil's cleanser is commonly recommended for people with sensitive skin, but some complain that it leaves a film on their face or isn't effective. Here are some tips for making it work: "I've used Cetaphil on and off for over a year now, and I've found the best way to use it is to firstly ensure that your face and hands are dry. Squeeze a small amount of Cetaphil into the palm of your hand, then emulsify it by rubbing your hands together for a few seconds before applying it to your face. Massage this emulsion around your face for about a minute. Remove it with warm water and a soft wash cloth. Emulsifying it before application seems to help it cleanse my skin much better (it goes a lot creamier) and the use of a wash cloth not only helps to gently exfoliate my skin but also stops it leaving a film" (JoshuaP).

Saturday, March 8, 2014

Sample Rundown #2


Another day, another stack of samples finished! And I was able to get a picture of me wearing all of these products at once except for the YSL Touche Eclat and one of the mascaras. Let's get to those first, eh?

Yves Saint Laurent Touche Eclat in Shade #1, Luminous Radiance -- A cult favorite, a product so often tried and lauded that I'm surprised they ever handed out samples! The card actually had samples of 3 different shades; I cut them apart, gave the darker 2 away, and kept this lightest shade. This product is meant to be a luminizer and brightener, not a concealer, but I labeled this post as a "concealer"-containing post because...well, some gifted people with no undereye circles DO use Touche Eclat as their concealer. I tried it in the most-recommended places: along my jawline, down my nose, and right underneath my undereyes (over concealer). It was nice...but nothing to write home about. It just made my skin look a tiny bit shinier. I think you'd enjoy this product more if you're in to the whole "highlight and contour to reshape your face" deal, or if you wore heavier foundations than I do and needed to put radiance back in to your skin.

Bare Escentuals Buxom Lash mascara -- Straight off the bat, let me say that writing "Escentuals" always makes me twitch. Beyond that, this is a pretty nice product. The brush is covered in tiny rubberized bristles that comb through your lashes and prevent clumping. It's very black and provides plenty of length. There was hardly any flaking, which is as much as I can ask from a mascara (as 99% of them will, in my experience, flake at least a tad). Buxom Lash is relatively natural-looking on me. It's a very nice mascara, but I usually prefer very thickening, volumizing mascaras, and if I want something natural, there are more affordable drugstore options I prefer. Still, it's a good option for those who want a plush, lengthening formula.

Alright, now for the rest of the stuff, which is all on my face in these pictures. Expand for super-creepy-HD-macro-goodness!


Smashbox Full Exposure mascara -- Talk about a disappointment. This run-of-the-mill mascara tinted my lashes and did little else, even after applying coat after coat of the product. I've scanned a few other reviews, and some people are apparently blaming it on the brush, which is Ye Olde Fashioned Mascara Wand. I have to disagree: Prestige My Biggest Lashes and Jordana Best Lash Extreme have pretty much the same wand, and they are incredibly dramatic. No, the formula of this is just kinda...crap. Pass.

Yves Saint Laurent Top Secrets All-In-One BB Cream in Shade #1, Clear -- Here's a tricky one. I've been so on the fence with this product that I've actually posted the above pictures on Makeup Alley to crowd source opinions on how it looked, and I'm still not 100% on whether or not I'd continue using this product. The actual product is a creamy, smooth liquid with a gag-inducing scent, and it looks simultaneously Pepto-Bismal Pink and Gray when first applied. It has light coverage and looks fine on my normal and oily areas, kinda dry on my dryer areas, and a bit too dark/pink. But after 15-20 minutes and a light dusting of powder through the t-zone, it looks...pretty much fine. Not too dark or too pink, not oily on my nose, smooth and lovely on my dry skin...hum. I don't think it's quite as fantastic as MAC F&B on my skin, but let's be honest: what is? I'm not buying a full-size for now because the price is ridiculous, there's no SPF (this is a BB cream, guys, WTF), and I'm not sure how I feel about it, but maybe I'll swap for a tube and give it further tests. Any thoughts, guys? Again, I'm wearing it in the pictures above with a bit of the Suqqu powder (described below), but no concealer.

Fyrinnae Lip Lustre in Ocelot -- I knew this color was too pastel and porn-ish as soon as I put it on (the natural+flash picture is the best representation of what it looks like IRL), but I gave it a test to see how I liked the formula. These lip lustres are essentially cream lipsticks: they aren't shiny like a lipgloss or transfer-proof like a long-wear lipstick, but they're opaque on the first swipe and have decent color payoff. You can kind of feel this on your lips, which doesn't bother me in the slightest, but those of you who are in to weightless lippies may want to pass. My biggest complaint with this product is that it accentuated dryness and fine lip lines, although applying a second coat softened that up a bit. I might try this formulation in a few more colors, but for now, I'm not impressed enough to rush out and order more.

Mai Couture Highlighter Paper -- I knew this was a gimmick when I added it to my Nordies cart months ago, but I figured it'd be fun. This sample pack contains 2 pieces of highlighting paper. One side is coated in shimmer, the other side is bare/matte...I'm probably stating the obvious here, but you're meant to hold the bare side and dab the shimmer side on to your face. I was afraid this would spit glitter everywhere when I opened it, but actually, the highlighter sticks to the paper like glue. Which, um, makes it kind of awkward to get it on your face. You kind of have to rub this piece of paper all over your cheeks, and because it IS paper, it gets crumpled and things apply unevenly. The shimmer is also...well, pretty obvious shimmer. I can't see too many people having a use for this product when there are much better highlighters on the market.

Suqqu Loose Powder in Natural -- Crap. Crap crap crap crap crap, I think I love this stuff. I avoid loose powders like the plague because they're messy and hard to travel with; when I dumped this tiny sample pot o' Suqque powder a kind MUAer had given me in to an empty MAC compact, powder fluffed up on to my desk. But holy squid on a stick, this powder is gooooorgeous! It's so finely-milled, a little goes a long way, and it feels beautiful on my skin. The oil control properties aren't the best, but I tend to think of this as more of a setting-and-bettering powder. It makes my skin look flawless. Everybody, start telling me that Suqqu is an evil company that promotes baby eating so I don't feel the need to get a full size of this! >_X

Monday, January 13, 2014

REVIEW: DiorSkin Nude BB Cream


I was beyond sad when I left my boyfriend at the airport last week, so I decided to splurge on one last makeup item in the Duty Free store before starting my No Buy. I haven't used much Dior besides the lash primer, and I've been curious about their base products, so I went straight for this BB cream. Not only did it offer a bit of sun protection and the lighter coverage I prefer, but it also came in an incredibly light shade, 001 Light. (The second shade is 002 Fair, but don't be fooled: 001 is definitely lighter.) It swatched beautifully on my N5-ish jaw, so I didn't hesitate to plonk down the $44.

The packaging for this BB is absolutely flawless: it's a squeeze tube, meaning you can squish out every last drop of product, and it has a pump, which makes it more sanitary. It's very easy to control how much comes out of the pump; I was able to disperse a pump-and-a-half of product to cover my face and the top of my neck without trouble.


The product itself is a very smooth, creamy foundation that feels beautiful when blended on to the skin. I was able to smooth it on with my hands and with a brush without trouble, and I found that it had the same amount of coverage regardless of what method I used: more than most tinted moisturizers, but less than a medium-coverage foundation, with a slight dewy finish. My zits and undereye circles were "softened," but not completely covered.

It absolutely reeks of cheap cucumber melon perfume, though, which I found appalling; if you're going to advertise a product as part skincare, you shouldn't load it up with fragrance. Furthermore, if you're going to claim that a product's main purpose is sun protection--as the back of this product's box claims--you seriously need to do better than SPF10.


At first, I was 95% thrilled with how this product looked on my skin. Although I knew it was a smidge too pink from the get-go, I didn't think it was horribly noticeable, even in these HD photographs. Cream and powder products blend over it very well, and it doesn't transfer on to my clothing. But I also realized that this wasn't a product for certain skin types.


I'm a little sorry for this Super Creepy HD shot of my nose, but I think it illustrates an important point: this is NOT a product for oily skin. I took this picture immediately after applying the product to my oily nose, and you can see that it's already greasy, with the product separating and migrating to my pores. I didn't powder for the sake of this review, but if you have combination skin, you'll want to powder this product down, and if you have straight-up oily skin? It's not the product for you.

Now, it looked absolutely beautiful on the rest of my face, which is quite dry, except for a few spots...


...spots with flaking or textural issues. This close-up shows how lovely the DiorSkin Nude BB Cream looks on areas that are dry-but-smooth, but it also shows the minor flakes on my cheeks and at the corner of my mouth being emphasized. And yes, these are minor flakes brought on by using acne spot treatments, not instances of prolonged textural issues. Hence, I would only recommend this product to people with normal to dry skin and no texture issues.

But again, 95% thrilled! It had the perfect amount of coverage for me, felt nice on my skin, and looked great on 3/4 of my face. And I have no problem powdering and priming my nose, since it's the one "really weird" part of my face. I was willing to overlook the terrible smell and slight pinkness because of how convenient this BB cream would be for my needs, seeing as I travel long distances to work and prefer to do my makeup on-site on those days.


Alas, it was not to be. Not only does this product completely break down on my oily nose (so much so that even blotting powder couldn't save it), but it also darkens up and gets more pink after about 20 minutes. You can really see this happening in the natural light picture on the right: my neck is about N5, and the BB cream has darkened to NW15-20. Many reviews for this product mention the same "darkening" effect, and some foundations are just formulated in such a way that they will get darker shortly after application. This was quite a shade jump, though, seeing as it went from about NW5 to NW15--two full shades darker. If you want to try this product, I highly recommend requesting a sample first.

So alas, this product didn't work for me, and the people it will work for are a small group. While it will probably look beautiful on those people, it's also going to give very little sun protection (regardless of what its advertising states) and reek to high Heaven. Color me disappointed...and two shades too dark.

RATING: 3 out of 5


Note: the Dolce & Gabbana Creamy foundation applies lighter than it swatches. Koh Gen Do Manifashi Moisture foundation oxidized on me, but doesn't on most people.

Wednesday, October 2, 2013

Swatches: Smashbox Camera Ready BB Cream and Becca Radiant Skin Satin Finish Foundation

I sure do take my good, sweet time when it comes to foundation swatches, don't I? My apologies; I should've had these up months ago. Hopefully, they're still helpful! And if it makes you feel better, neither product has a shade match for me.

As per usual, there's a shot with flash/artificial light (top) and a shot in filtered daylight (bottom).


Up first is the Smashbox Camera Ready BB Cream. Sorry about the slightly meager, sloppy swatches; the samples were pretty tiny. I swatched these on my inner arm, which is roughly N5, so I'd guesstimate that the lightest shade--Fair--is about NW15-20. All of these shades seem to have incredibly pink/red undertones.


This is the Becca Radiant Skin Satin Finish foundation, which I've actually tried in Shell. I swatched these on the top of my arm (so yeah, sorry about those arm hairs...), which is about N15 right now. Based on that you'd think Shell would work for me...but it's far more yellow than it looks. When I tried it on my face, it looked downright GREEN, and I washed it off after all of 15 minutes. Porcelain is uber-pink, but quite fair. I'd guesstimate that Porcelain is about NW10 (which very strong pink undertones) and Shell is around NC15 (which very strong golden-yellow undertones). Buff and Buttercup are almost identical in shade depth; the major difference appears to be the undertone.

Also, the Becca samples were super-generous, so huzzah! :)

Saturday, August 3, 2013

Review: Maybelline Fit Me Shine-Free Foundation


Forgive me, dear readers, for I have once again fallen down the drugstore foundation rabbit hole. After promising myself that I would no longer get suckered in to bargain base product hype--as next to no foundation is pale enough for me, especially when it comes to drugstore options--I tripped, fell, and landed on Maybelline's new stick foundation. I'd like to blame my weakness for stick foundations and good sales.

Disregarding the sale price and my coupons (yes, I'm one of those people), the Maybelline Fit Me Shine-Free Foundation stick cost me $7. It contains 0.32 oz of product, far less than the average liquid foundation, but about par for the course when it comes to sticks. I chose the lightest shade, 110 Porcelain, as I'd been told the shade options in the stick foundation match up to the liquid. I'm afraid I have to disagree; while 110 in the liquid is a pale, cool yellow, 110 in the stick is quite pink. (Swatches at the end of this post.)


The big draw for this product is what Maybelline is calling an "Anti-Shine core" with built-in powders. This is supposedly meant to blend with the actual foundation, which is a sort of gel formation, and prevent oil breakthrough and shine throughout the day. I really wanted to test those claims, so while I finished off my face with a bit of sheer undereye concealer, I didn't use any powder or primer.

Also, just a note: I didn't find that the white powder core changed the actual shade of the foundation. It was actually completely clear, regardless of how much I poked my finger in to it. This means that the product should not turn insta-ashy on darker skins.


Shine-free isn't a claim I'm usually drawn to, but because it's summer, my skin is a bit wonky. While I'm normally combination-dry, my summer skin is closer to true-blue combination, with a dry chin, cheeks, and temples, normal forehead, and oil-slick-beyond-belief nose.  I walk to work most days, which means I'm also dealing with a slightly darker skintone (N10, bahahahaha!) and more hyper-pigmentation and discoloration. Lastly, I had a big, red zit on the right side of my chin (it appears on the left side of the first photo). Zits are awful most of the time, but if you're testing a foundation? GODSEND.


I found the Fit-Me Shine-Free Foundation quite pleasant to apply. The formulation is creamy and applies smoothly. I applied it directly to my face from the stick, but you could also rub your fingers or a taklon brush over the product and still get a good effect. It doesn't dry EXTREMELY fast, but because it's meant to set to a powder finish, I tend to work in sections. And this product does, in fact, feel like a soft powder under my fingers. It applied without issue to all areas of my face: oily, dry, and normal.


One layer of product gave me very sheer coverage. It lightened up some of my pigmentation, but didn't completely conceal my chin zit. After waiting a few moments for this layer to dry up, I slicked another layer on my "problem areas," ie, my nose and chin.


The second layer finished the job: while it's still light coverage, the foundation is covering my zit and discoloration. Again, the second layer applied quite smoothly over both areas and did not pill up. The finish, in my opinion, is a natural demi-matte.

This foundation is also very comfortable. I couldn't feel it on my face, even after applying multiple layers, and it didn't have any noticeable scent. I also don't feel like it made my face look Pepto-Bismal pink, despite the super-cool undertones of the swatch; I think the sheerness of this product means that each shade will be workable for most undertones.


But hold on, my friends! Not all is well in Fit-Me land. While my foundation looked mostly-nice and fresh after 1 hour, I noticed that my nose had gotten a bit shiny. Not exactly what a "Shine-Free" foundation should look like, right?

By the 2 hour mark, I noticed that my nose was even shinier, and the product had begun to pool in my pores. This is unusual for me: even though my nose is very, very oily, my pores as a whole are quite small, and I almost never have to deal with a base product making them look huge. The Fit Me stick foundation, however, definitely mode those big, bad nose pores stick out. On the flip side, it still looked lovely on the rest of my face.

When I took my last picture after 5 hours of wear, I knew that this was no shine-free foundation. Again, I am not an oily-skinned person, even in summer, with the exception of my nose. But as this photo shows, I was quite shiny on most parts of my face by the end of the day. The t-zone probably could've been fixed with some powder, but because this product advertises itself as having an "anti-shine," powder-based core, face powder shouldn't be a necessity. I will note, however, that the product didn't look completely awful on my somewhat dry chin, and it looked just fine on my dry cheeks.

But since I've mentioned my cheeks, I should also add that Fit Me has another problem: cream products don't blend over it that well. As you can see in the pictures above, my cream blush got a tad blotchy and was very hard to smooth out. This is another issue I'm not used to dealing with, and I think it may have to do with the powders that are supposedly in the foundation core.

Overall, I find this foundation a bit difficult to rate. It's not BAD by any means: it's affordable, blendable, comfortable, and provides light coverage with a very natural finish. It's also travel-friendly and has a decent shade range. And on dry skin, or on combination skin with the help of some powder, it could work out just fine. I wouldn't be opposed to wearing it in another season when my skin once again dries up like the Sahara.

But the bottom line is that this product doesn't do what it's meant to do: give you a shine-free finish. The "Anti-Shine Core" does not "instantly dissolve excess oil"; rather, the foundation dissolves instantly in your excess oils. I wouldn't be opposed to recommending this product to a select group of people, but that group? It would not include our oily-skinned friends.

RATING: 2 out of 5.


From left to right: Fit Me Shine-Free in 110 Porcelain, Kat von D Lock-It in #42, Dolce & Gabbana Creamy in #60 Classic, Kevyn Aucoin Sensual Skin Enhancer in Sx01, Tarte Tinted BB Treatment in Fair

Tuesday, April 9, 2013

Kill n' Keep: Mini-Reviews on the L'oreal Lineur Intense liquid eyeliner and Tarte BB Tinted Treatment


First up in my series of mini-reviews are these two little guys: the L'oreal Lineur Intense liquid eyeliner in Carbon Black and the Tarte BB Tinted Treatment in Fair. Hilariously enough, the product I had high hopes for ended up being a total fail, and the product I was initially doubtful of ended up being quite nice.

First up, the product that didn't wow me: the L'oreal liner. I've heard great things about how pigmented and smooth this product was, and it definitely is a beautiful, rich, black color. But unfortunately, it's not even mildly water-resistant.


Being one of those incredibly pale people with uber-light eyes, I have a mild sun allergy, and bright light--especially bright daylight--tends to make my eyes tear up. The L'oreal liner completely disappeared or flaked up at the first sign of liquid, as you can see above.

The packaging is also mildly irritating. The tube is completely nondescript; the only indication of what product it is is found on the little label on the bottom. And while it's nice to find a drugstore liner with a brush tip, the tip on this liner is a bit thick and rather boxy; I've been doing winged eyeliner for years now, but it was a bit of a struggle to get a precise, pointed wing with this brush.


Of course, when I went back and touched up where it had melted off, I fell back in love a little. It's just so rich and black and affordable--only $8 for a liquid liner with a brush! But alas, I know that it will melt at the first sign of rain, sweat, or tears, and that's a no-go for me. I'll use this product every once in a while, maybe when I'm going out or when I'm just darkening up the liner along my lashline, but beyond that, it's a total bust. RATING: 2 out of 5.


The Tarte BB cream, however, ended up being an unexpected like. Not only did it look quite dark when I first squirted it out of the tube, but the texture is so silicone-y that when I first began rubbing it in to my skin, I actually yanked my hands away from my face in shock. Granted, this product is marketed primarily as a primer, something you'd use under a foundation to give it more staying power and a bit more coverage. But because this product is tinted AND marketed as a BB cream, I was fully prepared to treat it like a light-coverage foundation. To its credit, the Tarte BB blended in to my skin very smoothly, provided light coverage, softened up on my dry-combination skin after about 15 minutes, and looked like a decent color-match. But I still didn't trust it, so I set it with some translucent powder.


Folks, I had no reason to worry: this baby stayed put through a walk, blotting with tissues, and a good 5-7 hours of wear. While it looks nice in daylight, it looks especially lovely in flash photography, as seen above. My skin almost appears slightly blurred and soft-focus, though of course, topping it with a slightly mattifying setting powder helped. And I did feel the need to dust a little more powder on my nose (where I actually get oily) after about 5 hours. Regardless, it looks nice and is in a doable shade for my N5-10 skin--a rare treat. I still get squicked by the texture, and I wish it was a bit more "ooh! aah!" in daylight, but overall, I quite like this product. RATING: 4 out of 5.